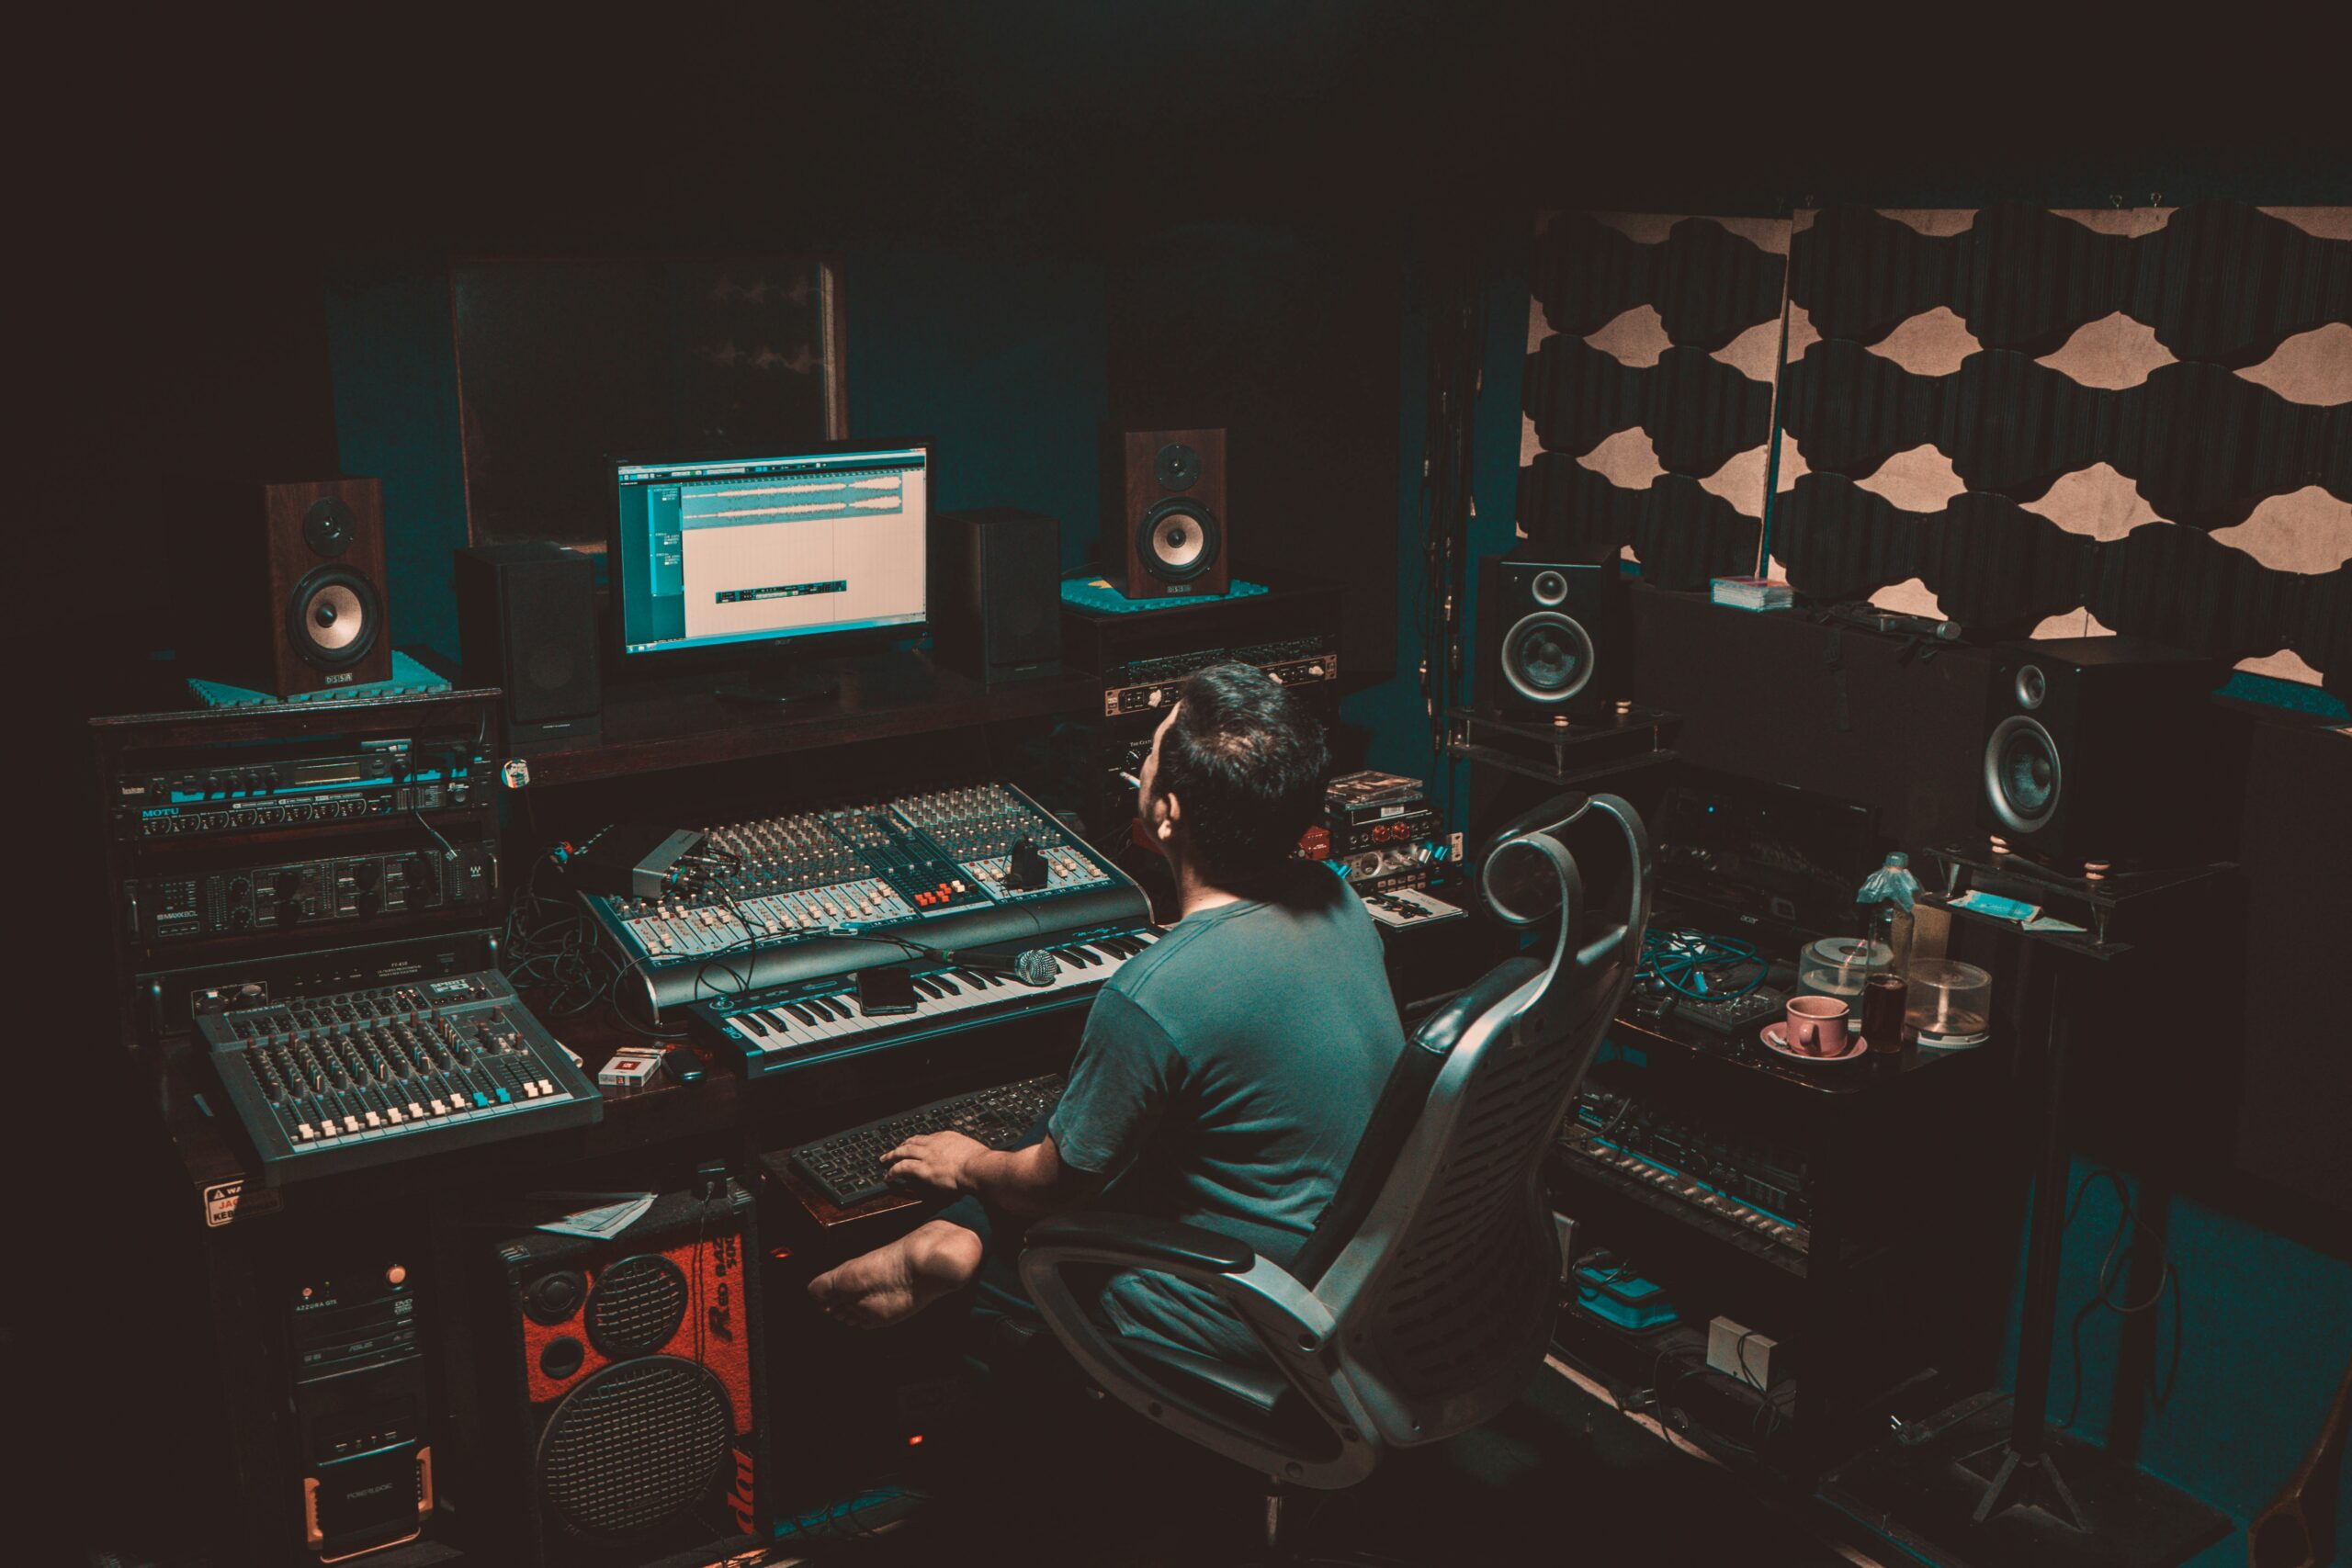
In the realm of home recording, achieving professional-quality results doesn’t always require expensive gear or a state-of-the-art studio.
With the right techniques and practices, you can capture stunning audio recordings that rival those produced in top-tier facilities. Whether you’re setting up a home studio, have limited resources, or are totally new to recording, understanding best recording practices is essential for success.
Getting Started
In this guide, we’ll explore some of the best recording practices tailored specifically for home studio enthusiasts.
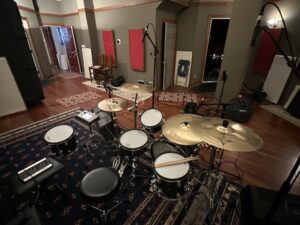
Creating an optimal recording environment doesn’t necessarily mean constructing a soundproofed studio from scratch. Instead, focus on minimizing external noise and controlling reflections within your existing space:
Choose the Right Room
Select a room with minimal background noise and ambient distractions. A bedroom, basement, or even a closet can serve as a suitable recording space with a few adjustments.
Reduce Reflections
Hang blankets, curtains, or acoustic panels on the walls to absorb reflections and minimize reverberation. This simple step can significantly improve the clarity and fidelity of your recordings.
Isolate External Noise
Close windows and doors to block out external sounds, and consider investing in a good pair of headphones for critical listening and monitoring.
Position Your Microphone Correctly
Proper microphone placement is crucial for capturing clean, balanced recordings with minimal unwanted artifacts. Follow these guidelines for optimal microphone placement:
Maintain Consistency
Keep the distance and angle between the microphone and the sound source consistent throughout your recording session to ensure uniformity across tracks.
Experiment with Placement
Don’t be afraid to experiment with microphone placement to find the sweet spot for each instrument or vocalist. Small adjustments can make a significant difference in the overall sound quality.
Mind the Room
Pay attention to the room’s acoustics and adjust microphone placement accordingly. Position microphones away from walls and corners to minimize reflections and achieve a more natural sound.
Use Proper Gain Staging
Gain staging is essential for ensuring a proper signal-to-noise ratio and avoiding distorted recordings. Follow these steps to achieve optimal gain staging:
Set Input Levels
Adjust the input gain on your audio interface or mixer so that the loudest parts of your signal peak just below 0 dBFS. Make sure to Avoid clipping, as this can result in irreversible distortion.
Monitor Levels
Keep an eye on your levels throughout the recording process to ensure they remain consistent and within an appropriate range. Use your recording software’s metering tools to monitor signal levels in real-time.
Avoid Overloading
If your signal is consistently clipping or distorting, reduce the input gain and adjust your recording levels accordingly. It’s better to record at a lower level and boost the volume later in the mixing process than to risk clipping during recording.
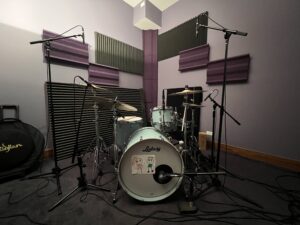
Pay Attention to Room Acoustics
Even in a home studio environment, room acoustics play a significant role in the quality of your recordings. Here are some tips for optimizing room acoustics on a budget:
DIY Acoustic Treatment
Consider building your own acoustic panels using affordable materials like fiberglass insulation, wooden frames, and fabric. There are plenty of online resources and tutorials available to guide you through the process.
Strategic Furniture Placement
Arrange furniture and other objects in your recording space to help break up reflections and diffuse sound waves. Bookshelves, sofas, and curtains can all contribute to a more acoustically balanced environment.
Experiment with Mic Placement
Use microphone placement to your advantage by positioning microphones to minimize room reflections and capture a more direct sound from the source.
Embrace the Power of Editing
Even the most meticulously recorded audio can benefit from a bit of post-production editing. Here are some basic editing techniques to enhance your recordings:
Trimming and Cutting
Remove any unwanted noise, clicks, or pops from your recordings by trimming the audio waveform using your recording software’s editing tools.
Equalization (EQ)
Use EQ to shape the tonal balance of your recordings, emphasizing desired frequencies and cutting out unwanted resonances or harshness.
Compression
Apply gentle compression to smooth out the dynamics of your recordings and ensure a more consistent volume level.
Reverb and Effects
Experiment with reverb, delay, and other effects to add depth and dimension to your recordings. Just be sure to use them sparingly and tastefully to avoid overwhelming the mix.
Invest in Quality Equipment Wisely
While you can certainly achieve great results with budget-friendly gear, investing in high-quality equipment will make a significant difference in the long run. Here are some essential pieces of equipment worth investing in:
Microphones
Invest in versatile, high-quality microphones that can handle a variety of recording tasks. Look for mics with transparent sound reproduction and durable construction.
Audio Interface
Choose an audio interface with low-latency performance, high-quality preamps, and ample input/output options to accommodate your recording needs.
Monitors and Headphones
Invest in a pair of studio monitors or headphones with accurate frequency response and comfortable fit for critical listening and monitoring.
Room Treatment
Allocate some budget for acoustic treatment materials to improve the sound quality of your recording space and minimize unwanted reflections.
Setting up a home studio on a budget doesn’t mean compromising on quality.
Conclusion
By following these best recording practices and techniques, you can achieve professional-grade results without breaking the bank. Focus on optimizing your recording environment, mastering proper microphone placement and gain staging, and embracing the power of post-production editing to enhance your recordings. As long as you prioritize the right things, you’ll be making pro-level recordings in no time.
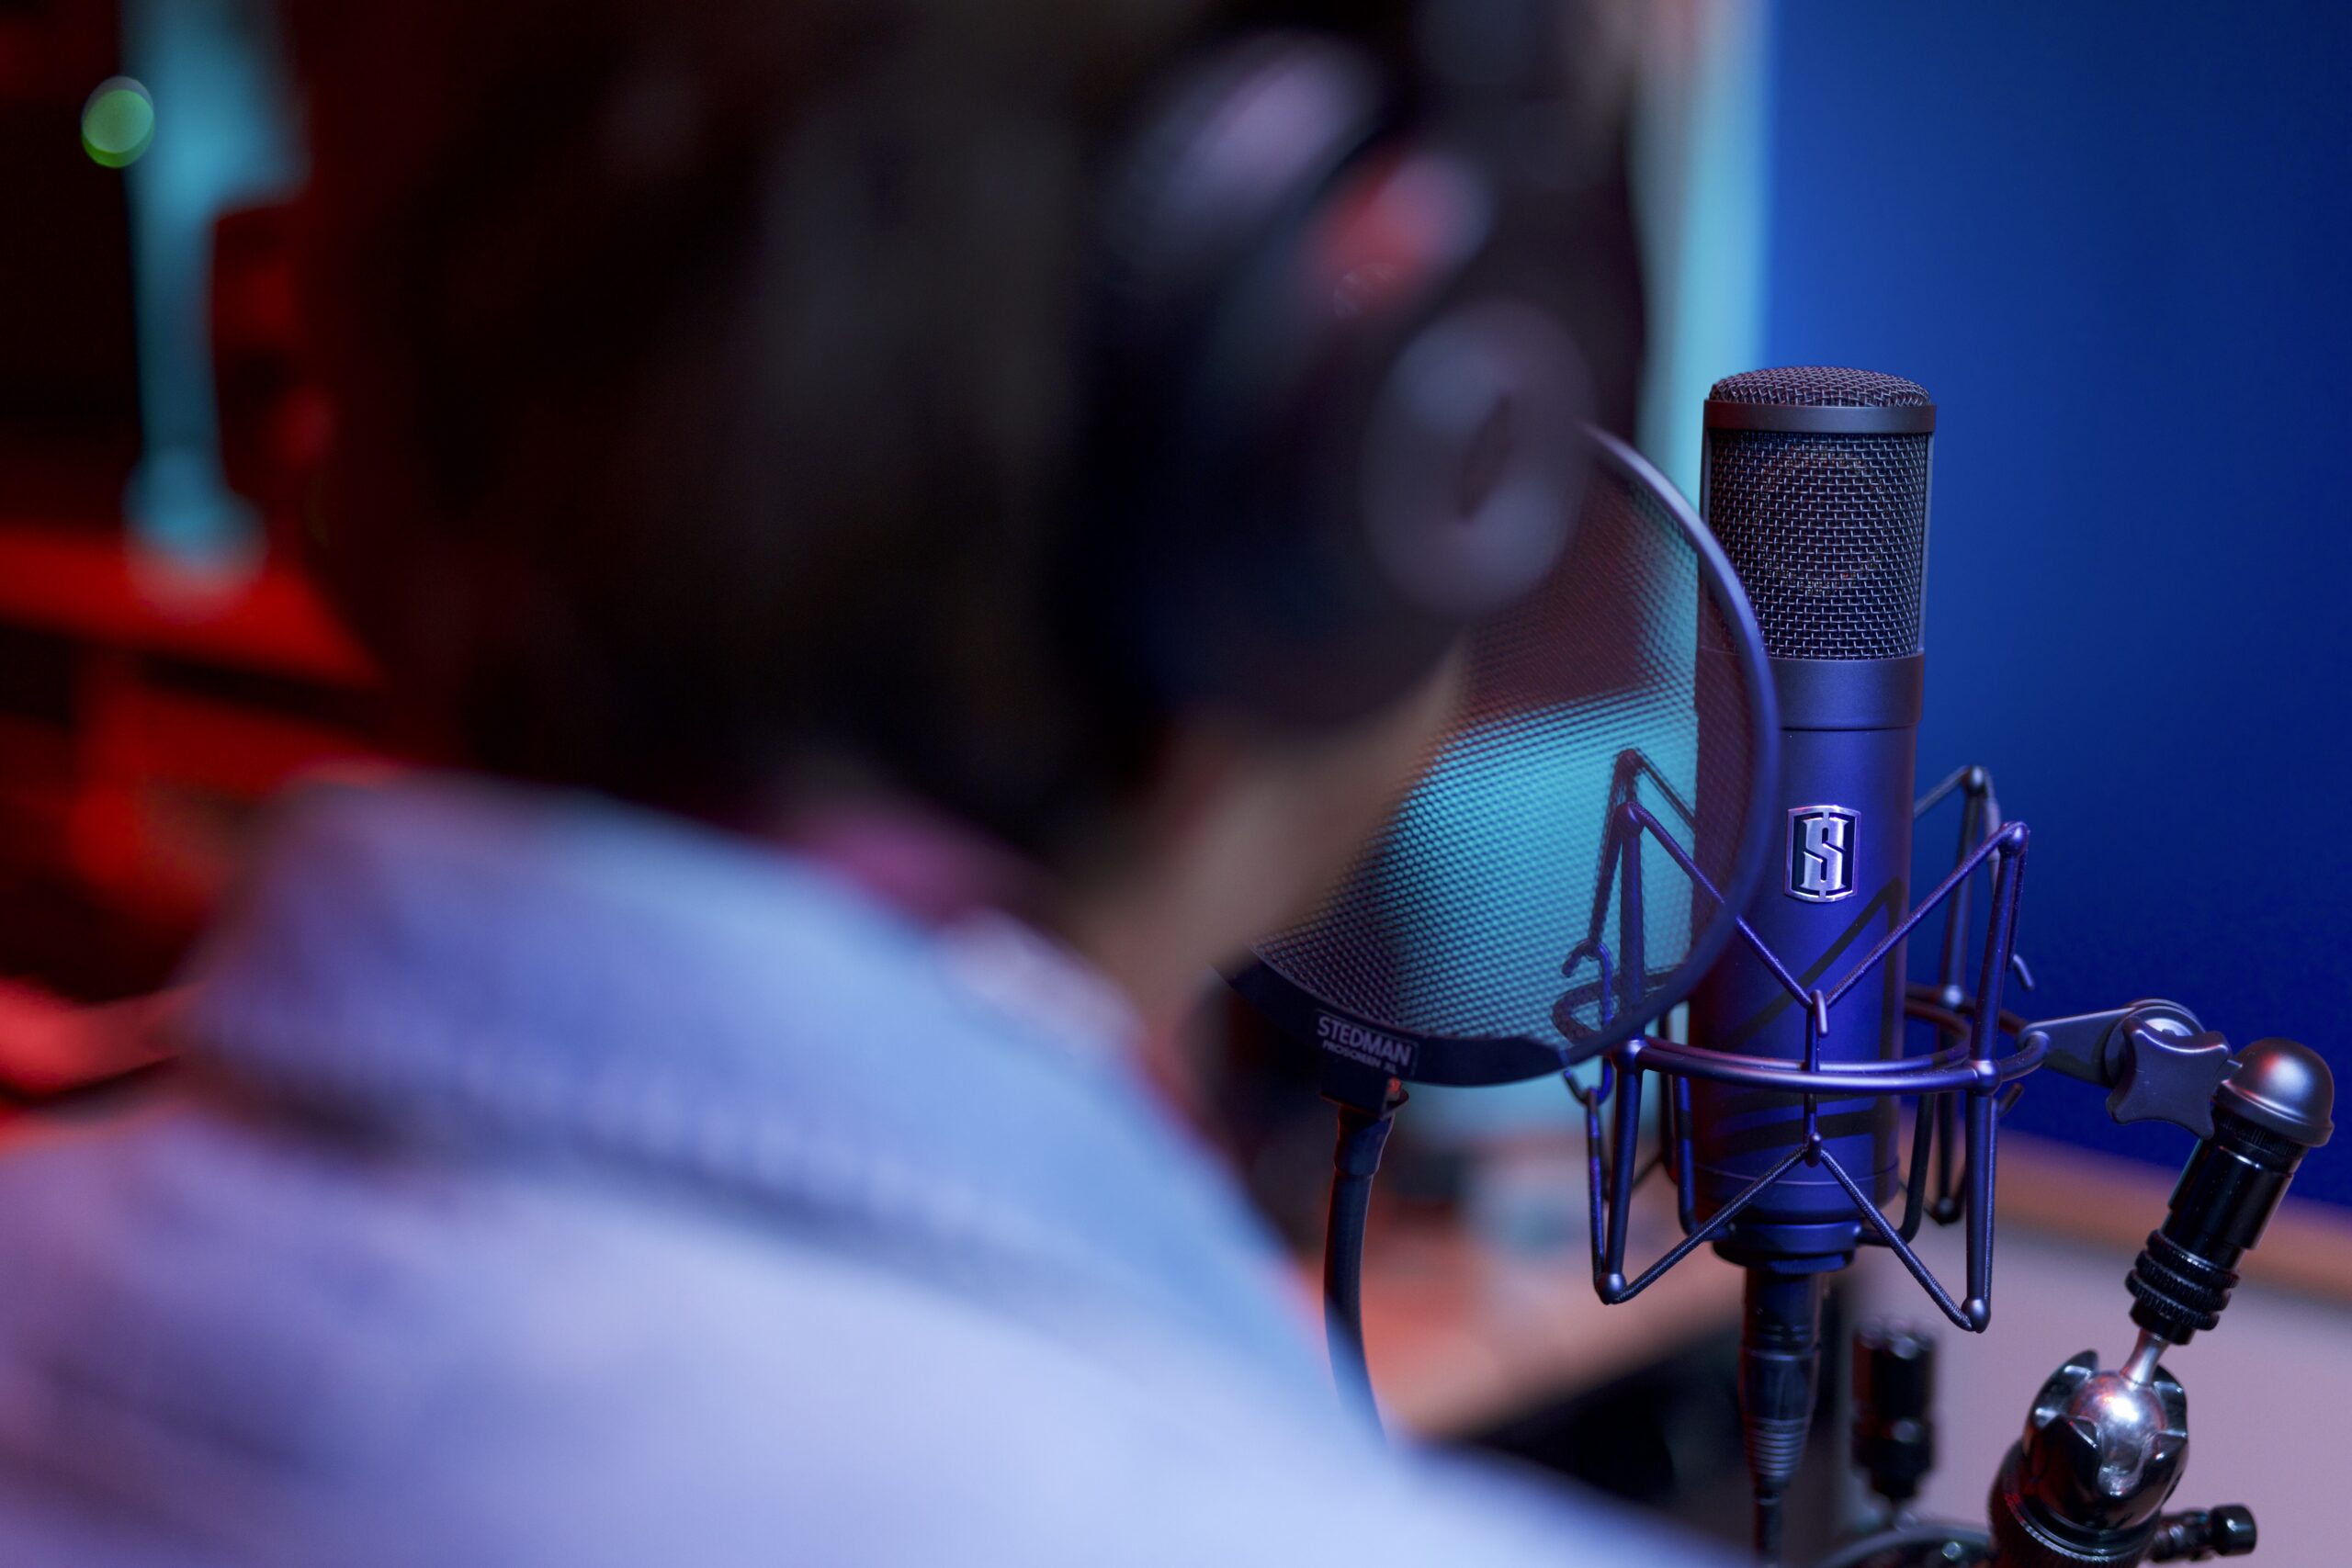
Whether you’re a musician, a podcaster, a streamer, or a content creator, choosing the right studio microphone is crucial for capturing high-quality audio regardless of recording space, especially if you’re trying not to break the bank.
In this short guide, we’ll explore the different types of studio microphones available, essential points to consider when buying, and what to prioritize when working with a limited budget.
Understanding Studio Microphone Types
Before diving into specific features and considerations, let’s first understand the basic types of studio microphones:
Condenser Microphones
Known for their sensitivity and ability to capture detailed sound, condenser microphones are common in studio settings. They require phantom power to operate, which comes from audio interfaces or mixing consoles.
Dynamic Microphones
Dynamic microphones are rugged and versatile, making them ideal for recording loud sound sources like drums and electric guitars. They don’t require phantom power and are less sensitive than condenser microphones.
USB Microphones
These microphones have built-in analog-to-digital converters and connect directly to your computer via USB. While convenient for beginners and those with limited space, most may not offer the same level of audio quality as traditional studio microphones.
What to Look For
When shopping for a studio microphone, here are some essential things to keep in mind:
Versatility
Look for a microphone that can handle a variety of recording tasks. Versatile microphones can save you money in the long run by eliminating the need to purchase multiple microphones for different purposes.
Durability
Whenever possible, make sure to examine a microphone’s build quality before you buy to ensure it’s sturdy and well-made. Pay close attention to the details: you’ll want to learn what materials were used in its construction, and it’s always good practice to get a sense of the microphone’s overall feel in your hand before bringing it back to the studio.
Frequency Response
A microphone’s frequency response determines how accurately it reproduces different frequencies. A flat frequency response is ideal for accurately capturing natural sound. Microphones with tailored frequency responses, meanwhile, are better suited for specific applications, like recording vocals or particular instruments.
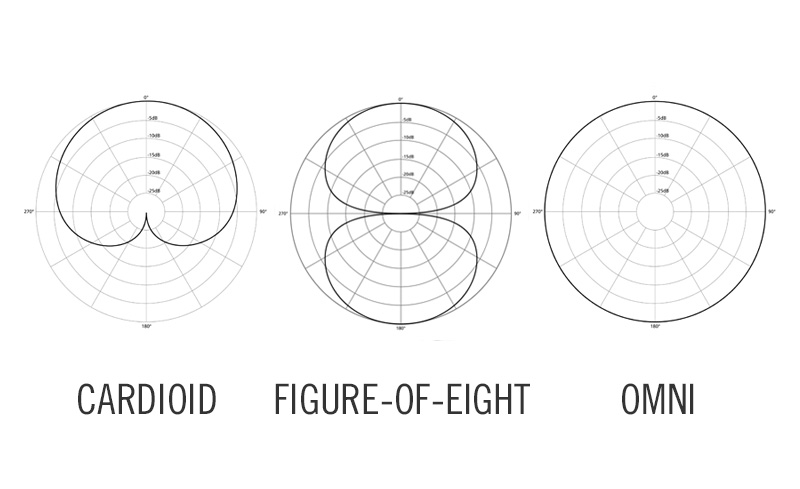
Polar Patterns
When buying a microphone, you should also think about its polar pattern. This refers to a microphone’s sensitivity to sound from different directions.
Here are the three most common polar patterns you’ll encounter in a recording environment:
Cardioid microphones are most commonly used in studio settings, as they only capture sound from sources placed directly in front of them.
Figure-8 microphones pick up sound sources from the front and back, which makes them great for duets or interviews with minimal bleed.
Omnidirectional microphones capture sound equally from all directions. This makes them ideal for capturing ambient sounds or group recordings.
Sensitivity and SPL
Check the microphone’s sensitivity and maximum sound pressure level (SPL) capacity before you buy it. Higher-sensitivity microphones are great for detailed captures of quieter sounds. Conversely, microphones with high SPL thresholds can handle louder sounds without distortion.
Compatibility
Finally, ensure the microphone you’re considering is compatible with your existing recording equipment. Check the connection type (XLR or USB) and ensure it will work with your current audio interface, mixer, and computer.
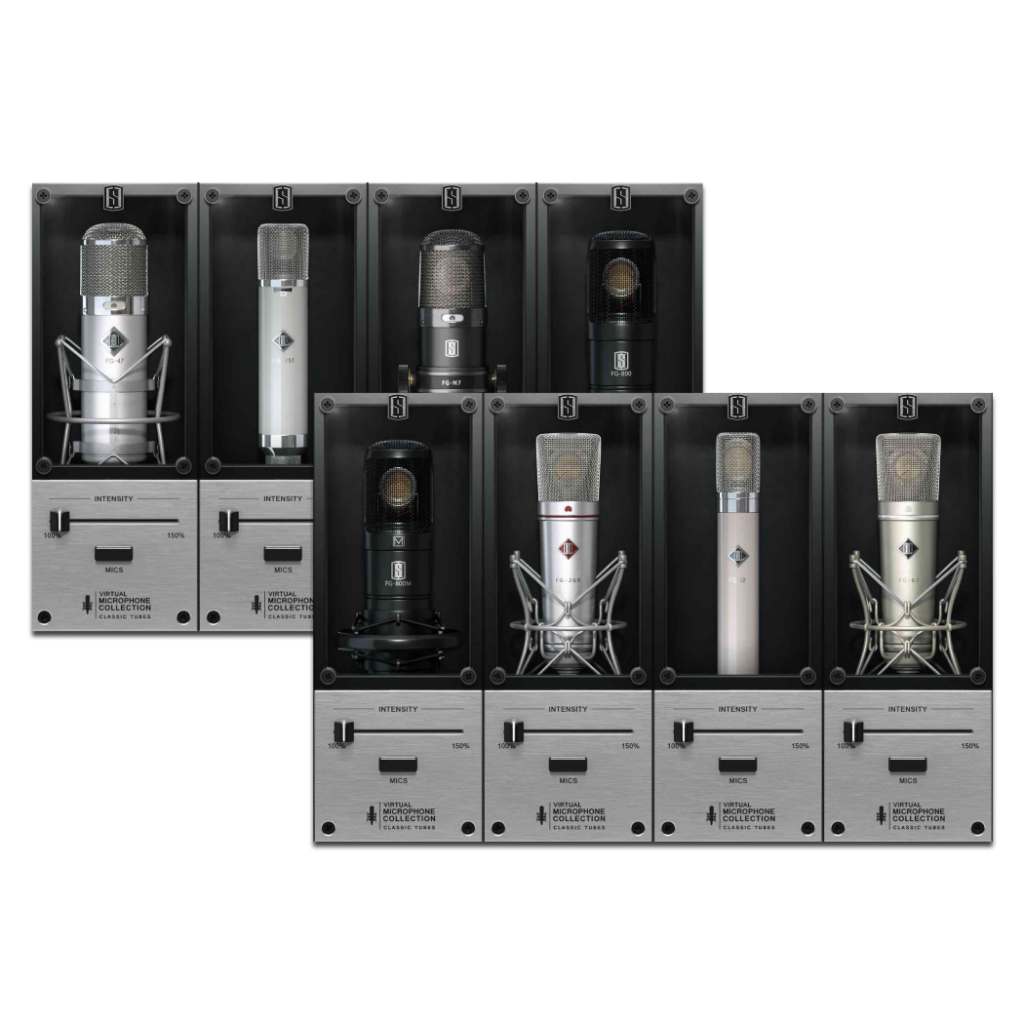
Our Favorite Studio Microphones
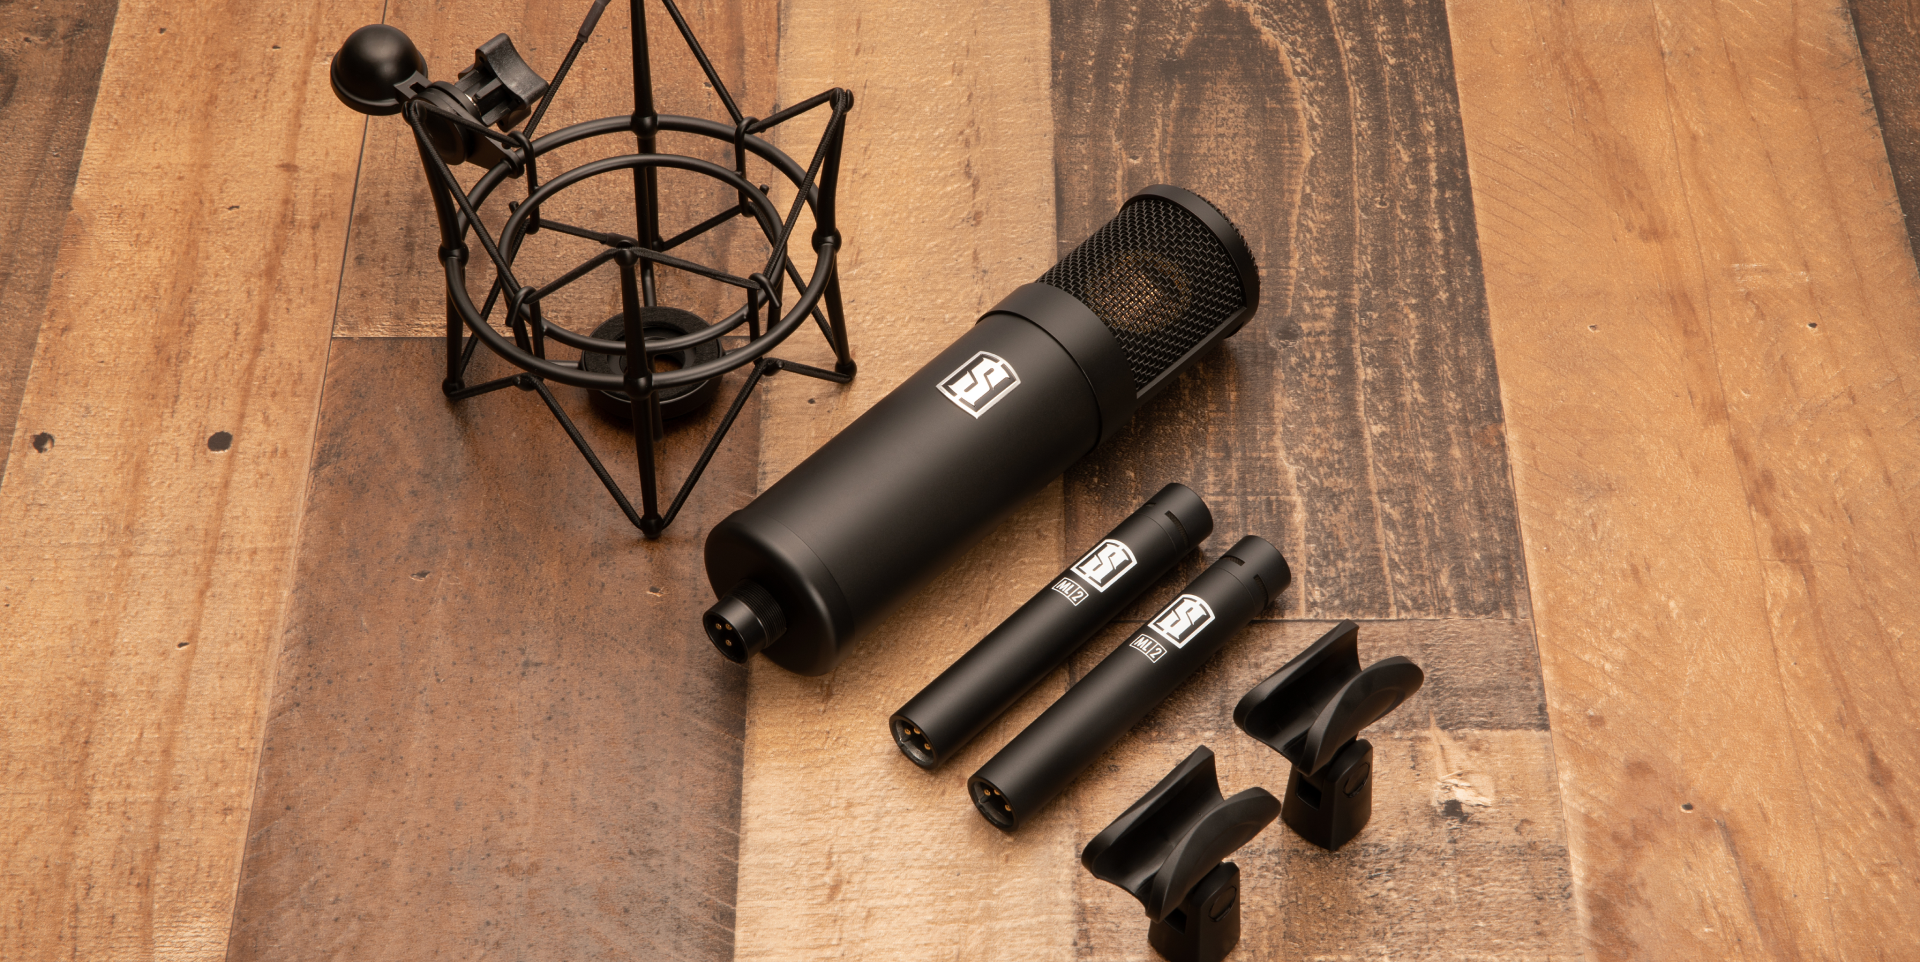
While there are many affordable studio microphones on the market, the Slate Digital ML-1 microphone and Virtual Microphone System offer exceptional value and versatility for the price.
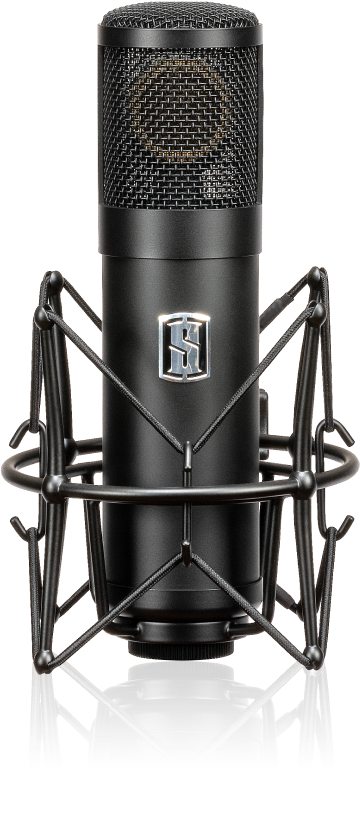
The ML-1 Modeling Microphone
The ML-1 is a high-quality condenser microphone that delivers professional-grade sound reproduction at an affordable price point. Its flat frequency response and cardioid polar pattern make it perfect for a wide range of recording applications, from vocals and acoustic instruments to drums and guitar amps.
The Virtual Microphone System (VMS)
The VMS software complements the ML-1 microphone by emulating the characteristics of classic microphones and preamps. With a selection of meticulously modeled microphone and preamp combinations, the VMS allows you to achieve the sound of vintage studio equipment without the need for a large budget or extensive gear collection.
By combining the Slate Digital ML-1 microphone with the Virtual Microphone System, you can access a diverse palette of sonic possibilities without breaking the bank. Whether you’re recording vocals, instruments, or podcasts, the ML-1 and VMS provide professional-quality results that rival much more expensive studio setups.
Conclusion
Choosing the right studio microphone for your home studio doesn’t have to be a stressful or super-expensive process. Stay mindful of your budget and specific recording needs, and you’ll find an affordable professional microphone that delivers professional-grade audio without sacrificing quality.
With the right microphone in your arsenal, you’ll be well-equipped to unleash your creativity and produce amazing recordings regardless of your studio space.
The concept of ‘online mastering’ doesn’t have to be scary.
The process of music-making is extensive. From the writing to the arranging to pre- and post-production, the road to a finished piece of music is a long one.
And fittingly, awaiting your arrival at the end of said journey is the most feared, mysterious step: mastering.
Understanding Mastering
Mastering is the art of refining and enhancing certain sonic characteristics of a song to ensure a universally high-quality listening experience.
Traditionally, mastering is done by professional engineers in professional studios. However, with the rapid development and democratization of professional-grade music production software, the mastering process has become more accessible than ever.
Through online mastering platforms, artists of all experience and financial levels can give their songs the professional polish they deserve. In this quick guide, we’ll look into the world of online mastering, exploring its benefits, drawbacks, and everything in between.
What is audio mastering?
Mastering is the last stage in the music production process before distribution. Its primary goals include enhancing clarity, optimizing volume levels, and ensuring consistency across tracks within an album.
The process typically begins with careful listening and analysis of the mixed tracks. The mastering engineer evaluates aspects such as tonal balance, dynamics, stereo imaging, and overall cohesion to identify any areas that may require adjustment.
Main mastering objectives
One of the primary objectives of mastering is to achieve optimal loudness and dynamic range. This involves using tools like compressors, limiters, and equalizers (‘EQs’) to balance the mix while preserving the original sound.
Another essential aspect of mastering is ensuring compatibility across various playback systems. This includes addressing issues such as frequency balance, stereo width, and phase coherence to ensure that the music translates accurately across different devices and environments.
In addition to technical adjustments, mastering also involves creative decision-making to enhance the emotional impact and sonic character of the music. This may include adding effects like reverb or delay, fine-tuning the stereo image, or making EQ adjustments to highlight certain elements of the mix.
The Shift to Online Mastering
In recent years, there has been a notable shift towards online mastering services. This shift is the result of several factors, particularly recent advancements in the capabilities and accessibility of digital music technology.
Online mastering platforms, like our VIRTU Assisted Mastering platform, allow musicians to upload and process their tracks remotely without the need for expensive studio sessions.
Additionally, online mastering services offer a level of convenience that traditional studios cannot match. Musicians can collaborate with mastering engineers from anywhere in the world, saving time and money on travel expenses.
The Pros & Cons of Online Mastering
While online mastering offers many advantages, it’s essential to weigh the pros and cons before diving in.
Pros
On the positive side, these services are often more affordable than traditional studio sessions, making the mastering process accessible to independent artists and small-budget productions. The availability of online music-sharing tools also makes it easier for projects to get done quicker.
Cons
However, using an exclusively online mastering solution isn’t without its drawbacks. Without an unbiased ear listening to your music, you might not be getting the most reliable results. You may also find you struggle with significant quality differences from platform to platform. However, most artists find that despite its flaws, online mastering is an effective, accessible way to give their mixes that professional touch.
Tips for a Successful Mastering Session
For musicians looking to take their first step into mastering their music, here are some things to consider:
Firstly, it’s essential to prepare your audio files properly before submitting them for mastering. This means making sure your mix is balanced and that there’s no audible peaking in your final mix (unless it’s intentional).
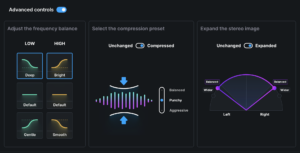
A clear sense of artistic direction is also crucial throughout the process. Even in the early stages of sketching out your track, having a sense of where you’d like to take it can help inform stylistic decisions down the road. With VIRTU, for example, you retain control of deeper creative decisions, like tweaking your overall EQ curve or spreading your mix a little wider.
Finally, don’t be afraid to experiment and try new things. Making music is all about taking creative risks and learning from them.
Conclusion
Online mastering is a convenient and accessible solution for musicians looking to elevate the quality of their recordings.
Whether you’re an independent artist or a seasoned professional, there are a host of online mastering platforms that provide a range of options to suit your various needs and budget. By understanding the basics of the mastering process and exploring the various online mastering options available, you can unlock your music’s true potential.
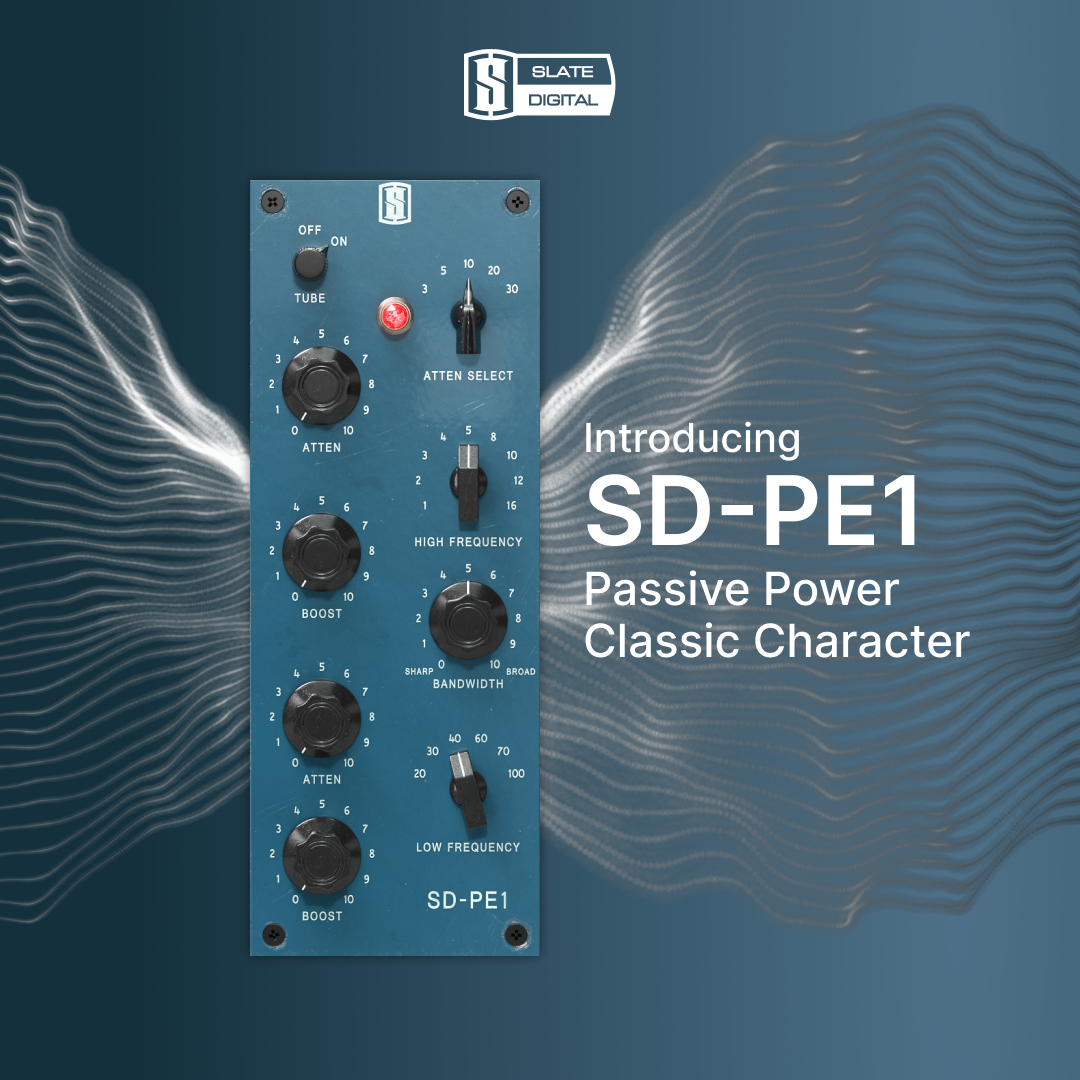
Slate Digital is thrilled to introduce SD-PE1, our brand-new passive EQ plugin.
A welcome addition to the Virtual Mix Rack ecosystem, SD-PE1 is based on one of the most coveted and beloved passive EQ units ever made. SD-PE1 delivers all the signature tone and color that made the original hardware unit so beloved, with some extra features sprinkled to make it even more useful.
At a Glance:
Passive EQ plugin
Digitally modeled off legendary outboard unit
Additional frequencies for deeper processing
Stepped and incremental frequency selection
Toggle traditional tube-stage saturation on/off
Perfect for drums, bass, vocals, and mix bus
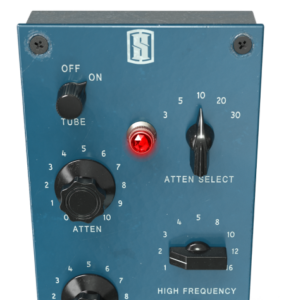
The original passive EQ that inspired SD-PE1 first appeared in the late 1950s. Immediately beloved for their notably warm quality, the earliest units were all made by hand by the company’s founders. This strict attention to detail resulted in superior build quality that has led to many of these original units still working more than 60 years later.
Built-In Vintage Warmth
On passive EQ units, the processed signal is output at a significantly lower volume than the input signal, requiring an additional clean boost step to hear the results of the processing. To remedy this issue, the original hardware also featured a built-in tube makeup gain stage that boosted the outgoing signal back to the desired level while adding an extra dose of saturation to it.
SD-PE1 captures all the iconic richness and tone of the original unit—with a twist. The plugin features the same tube stage, but as a switch that can be toggled on and off. This feature allows you to keep your crafted EQ curve without any additional coloration from the tube stage.
Unique EQ Curves
The original unit gained fame for its distinctive low-end boost and attenuation capabilities, especially in the sub and low-mid frequencies. Its renowned “kick trick” simultaneously boosts and attenuates the same frequency, creating a unique resonance that enhances clarity and depth without compromising warmth or punch.
This feature has established the EQ as a must-have in mastering studios, where it enhances recordings with weight and presence while preserving a natural, transparent sound. Ultimately, the SD-PE1’s EQ curves deliver a timeless and unmatched sonic character, cementing its status as the best passive equalizer plugin for achieving professional-grade audio results.
Further Frequency Selection
SD-PE1 also adds several additional frequencies that the original unit didn’t allow for. The high shelf control can now reach 3kHz on the low end and 30kHz on the high end. The high bell can now boost 1kHz and 2Khz, and the low shelf can affect 40Hz and 70Hz. These extra frequencies further enhance the sonic flexibility of the plugin without sacrificing the experience of using the original module.
To take things a step further, where the original hardware’s frequency selection was stepped, SD-PE1 allows for both stepped and incremental frequency selection. This means you can use the plugin both exactly as the original hardware was intended and as your own unique custom passive EQ.
Making the Plugin
In the video below, hear from our DSP team about how they built SD-PE1 and translated all the essential nuances of the original unit into this new plugin.
Availability
SD-PE1 is available NOW in Virtual Mix Rack for All Access Pass and Complete Access subscribers. It is also available for purchase at $149 as a perpetual license. Learn more and try it today here.
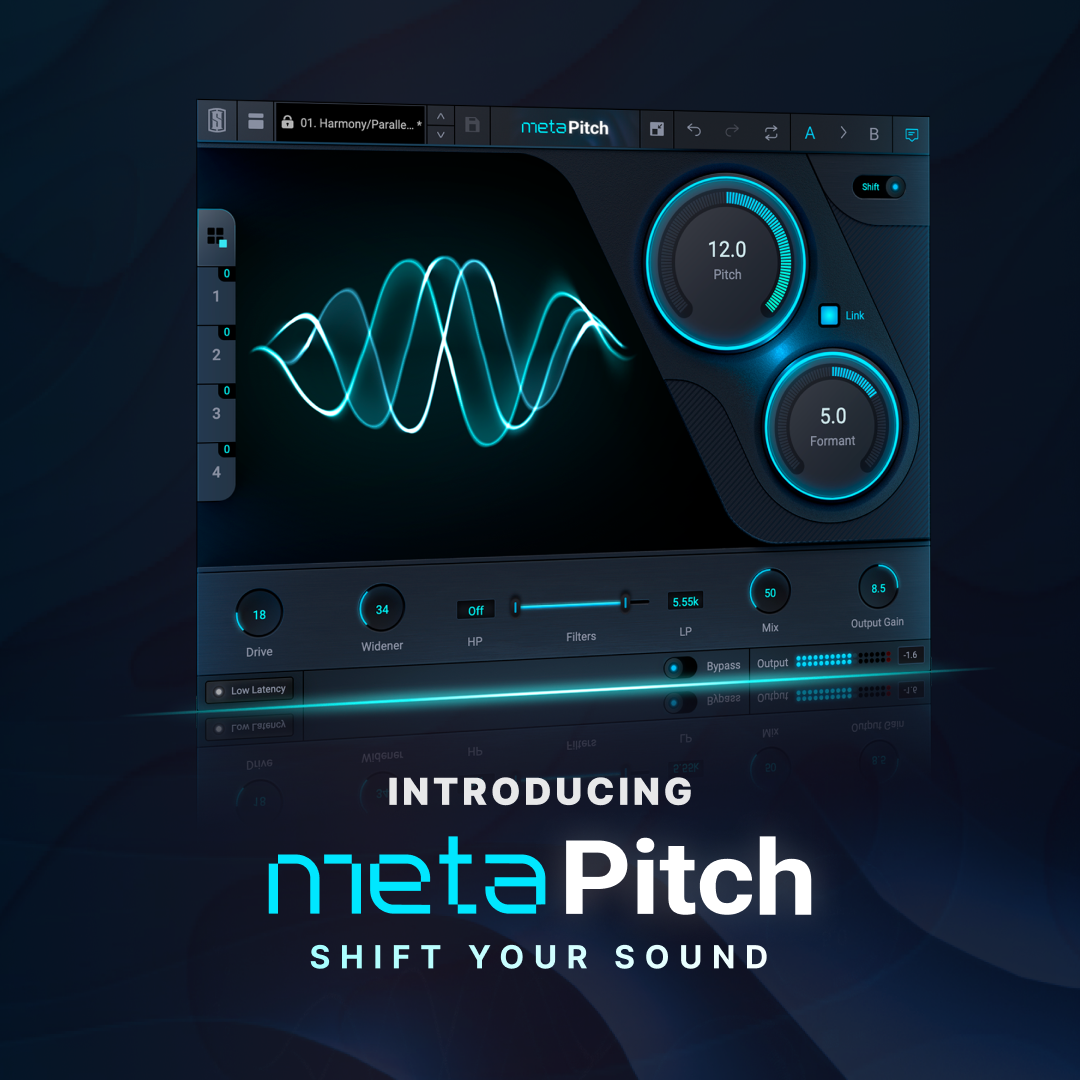
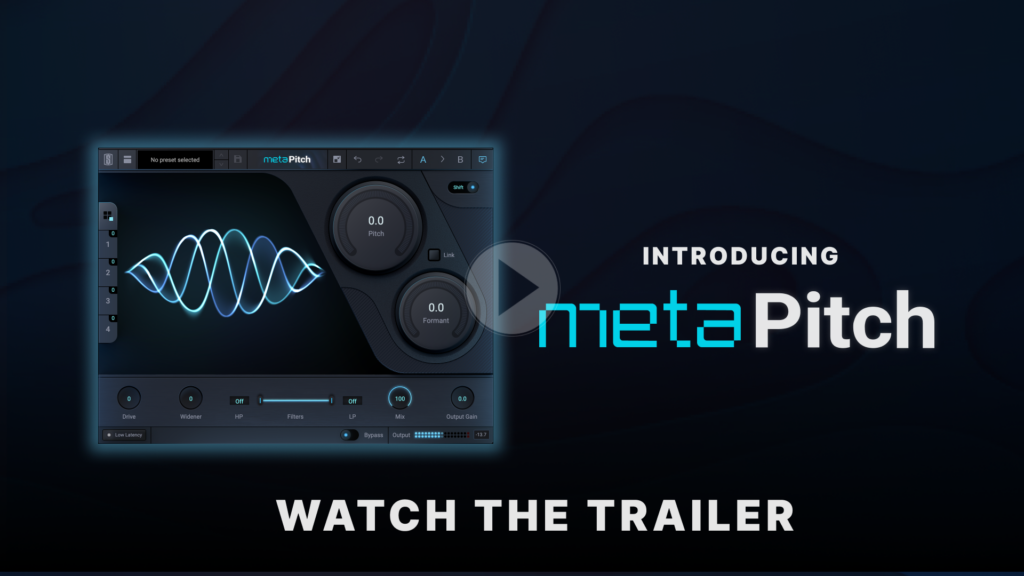
We are excited to share MetaPitch, a new vocal pitch-shifting plugin that’s versatile, efficient and easy to use. Tailored for monophonic sound sources such as voices or individual instruments, MetaPitch delivers essential controls for Pitch and Formant adjustments within an intuitive interface.
Additional features like Widener, Drive,and Filter controls are seamlessly integrated with the Mix knob for nuanced audio shaping, and the specialized “Robotic” mode adds a Vocoder-type touch to the source signal. There’s also a Low Latency mode that ensures accurate, real-time response during live tracking and monitoring, and a convenient grouping feature that allows you to affect multiple instances of the plugin at once.
MetaPitch lets you adjust the pitch of your source signal independently from the formant curve, opening up a wide array of avenues for sonic exploration. When affecting the harmonic series being sung or played while constraining the shape of the series to a fixed formant curve, the results sound more natural to our ears. Intentionally adjusting these things in a way our brains don’t anticipate can be a great source of special effects.
MetaPitch is available now for All Access Pass and Complete Access subscribers. To learn more about the plugin and subscribe today, click here.
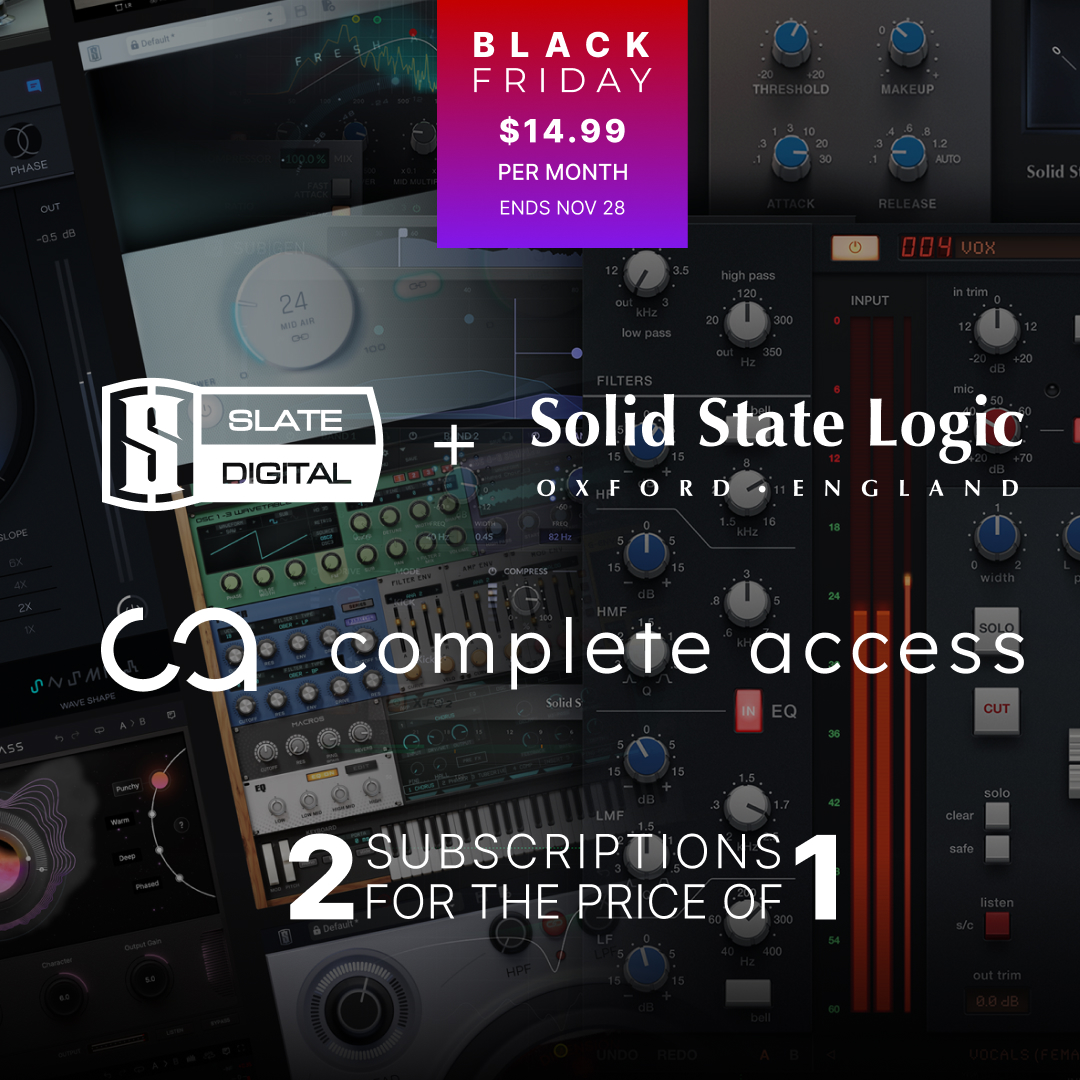
Chessington, UK, Nov 20th, 2023 – Two of the biggest pro audio plug-in brands, Slate Digital and Solid State Logic, have joined forces with a limited-time offer with access to BOTH their subscriptions for the price of one – just $14.99 per month plus local tax.* Available on their new joint subscription platform, customers will be able to keep this ever-growing dual ‘complete access’ package worth over $12k, indefinitely with a continuously renewed subscription.
The new ‘complete access’ offering combines two premium subscription packages:
With over 60 of the most prestigious processing and creative instrument plug-ins, including the latest VIRTU assisted mastering platform, Slate Digital’s All Access Pass has led the way in pro audio subscription offerings. It also brings incredible content with thousands of royalty free audio samples and exclusive boutique packs with presets, and access to hundreds of professional tutorials from leading producers and educators.
The SSL Complete subscription brings 30+ legendary Solid State Logic modelled consoles, compressors, equalisers, reverbs and delays, as used on decades of the world’s biggest selling music recordings. And with the acquisition of Harrison Audio, it includes a range of updated plug-ins direct from the music hitmakers in Nashville, USA.
Slate Digital also announce today the release of the FREE Heatwave plug-in, plus the Strongroom™ London Expansion pack for their ML-1 modeling microphone. Heatwave is a free-to-all, simple-to-use transient-preserving saturator plug-in available from their website. Heatwave adds varying levels of saturation while preserving or accenting the original transients, effortlessly adding punch to drums, grit to keys, and a sharp edge to guitars.
The Strongroom™ London ML-1 Mic Expansion pack is available with an introductory offer price of just $99 and comes with five new exclusive mic models from the eclectic Strongroom™ microphone locker; the SD-414 EB, SD-414 BU, SD-4038, SD-47 FET, and SD-12 VR.
Solid State Logic will also announce on November 22nd the release of another much anticipated new plug-in to add to their subscription plan and ‘complete access’ package, as well as perpetually.
John Bastianelli, CEO of Slate Digital, comments “We have been running this amazing dual offer with our current loyal subscriber family and they are loving it, so we are really excited to make the ‘complete access’ package available to everyone. Slate Digital has always talked big when it comes to Black Friday offers, but now with our partners at Solid State Logic and the release of Heatwave and the Strongroom™ London ML-1 mic expansion pack, I think we just raised the bar with deals available to new and current customers.”
Nigel Beaumont, Managing Director of Solid State Logic, adds, “Being part of the same pro audio family, then bringing these astonishing processing and creative tools from the All Access Pass to our SSL subscribers for no additional cost was a no-brainer. With strong plug-in releases coming from both brands in the coming weeks and months, ‘complete access’ subscribers will get even more value from this amazing deal.”
The ‘Complete Access’ offer is only available to new subscribers from November 20th until November 28th, midnight PST. For more information, please head to https://slatedigital.com/complete-access/
* Price shown is for the Annual Paid Monthly subscription
About Solid State Logic
Solid State Logic is the world’s leading manufacturer of analogue and digital audio consoles and provider of creative tools for music, broadcast, live and audio production professionals. www.solidstatelogic.com
Move from Gobbler now and receive the SSL Complete subscription FREE!
As you may be aware, Gobbler have confirmed via their website they have closed their marketplace platform and terminating support for all Slate Digital subscriptions from November 1st 2023. Although we have been contacting Gobbler subscribers directly, we are aware that many have not been contactable or are concerned the messages they have received might not be accurate.
Slate Digital are working hard in the background to help our customers move their subscription to our own platform to ensure continued access to your subscription, and ongoing new plug-ins and offers. We have created a dedicated webpage that provides all the details on how to move your Gobbler account and receive FREE access to the SSL Complete subscription as a thank you here.
NOTE: All current ‘All Access Pass’ direct subscribers with Slate Digital will receive this upgrade offer in the coming weeks once we have helped our Gobbler customers.
Not sure if you are a Gobbler subscriber? Simply check your credit or bank statement to see if the issuer of the subscription is ‘Media Gobbler Inc’ – if it is then you need to move your account before you lose access to your Slate Digital plug-ins.
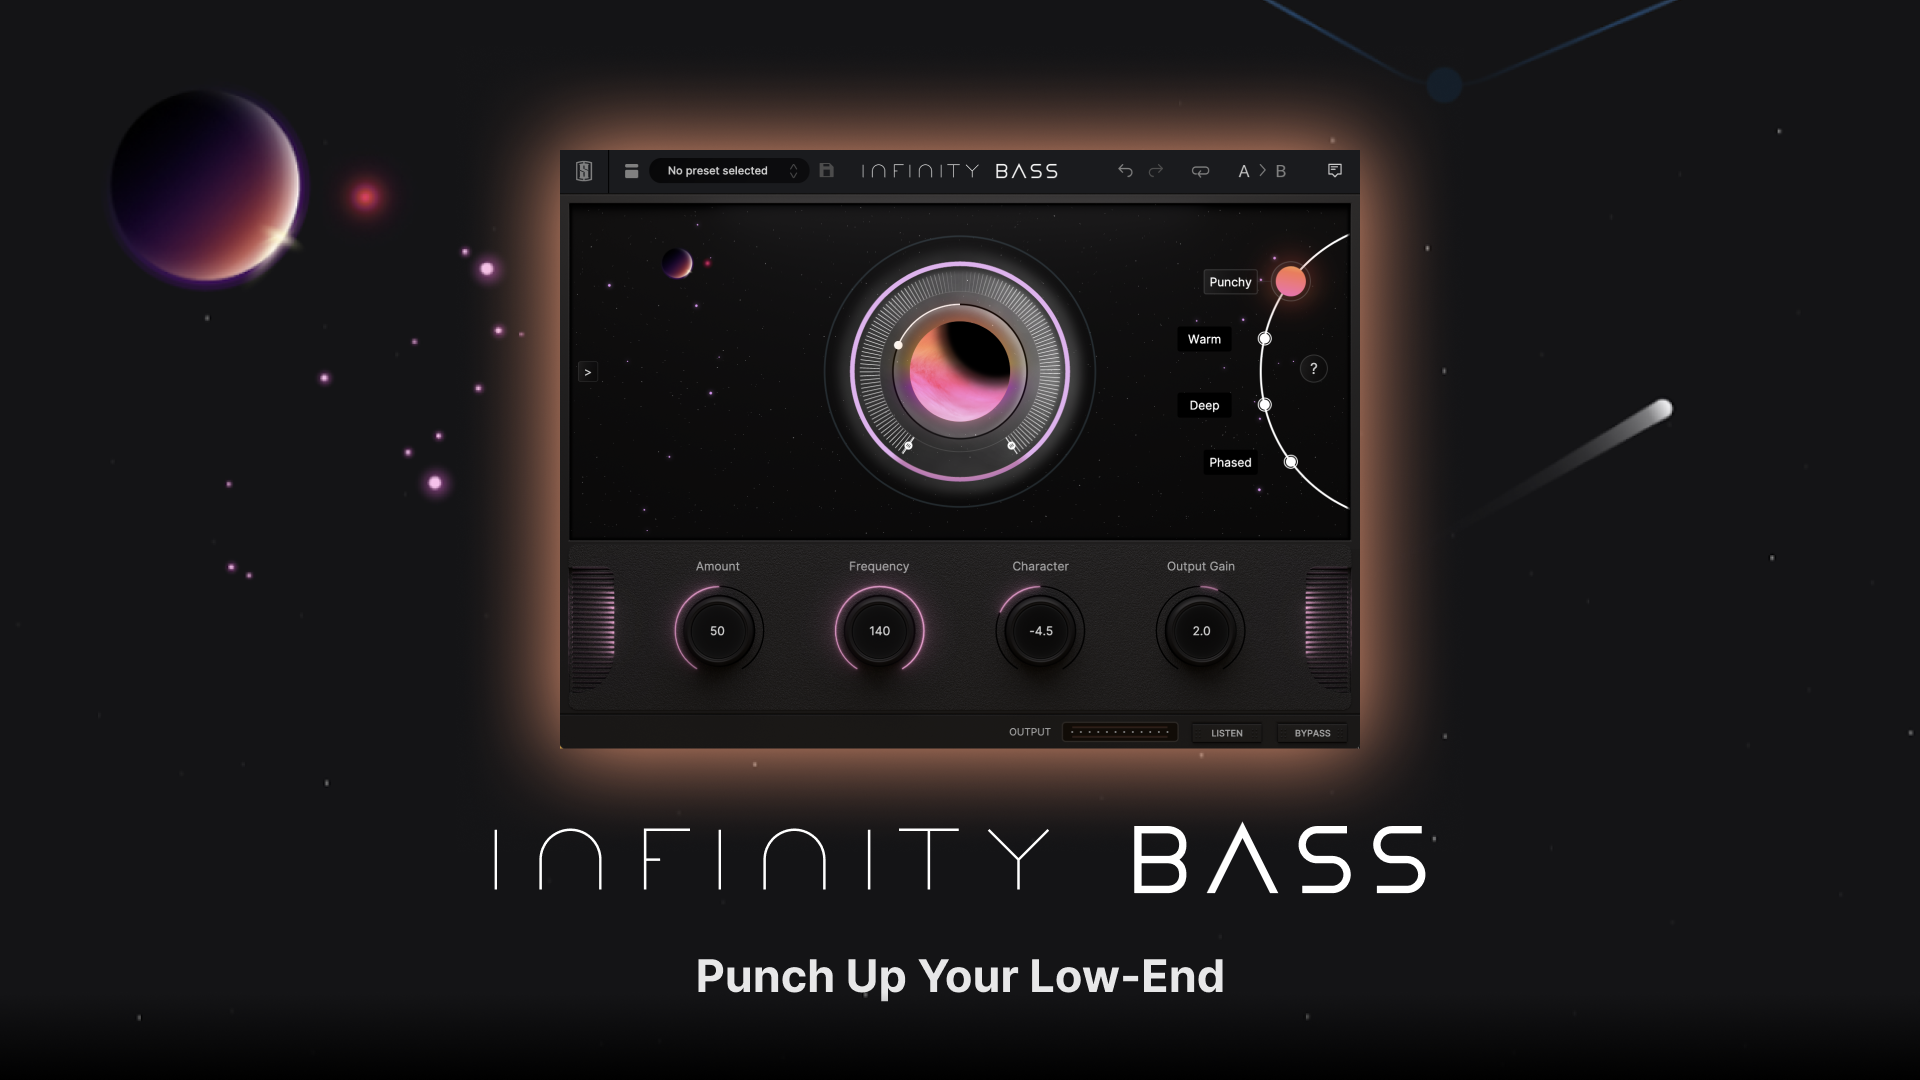
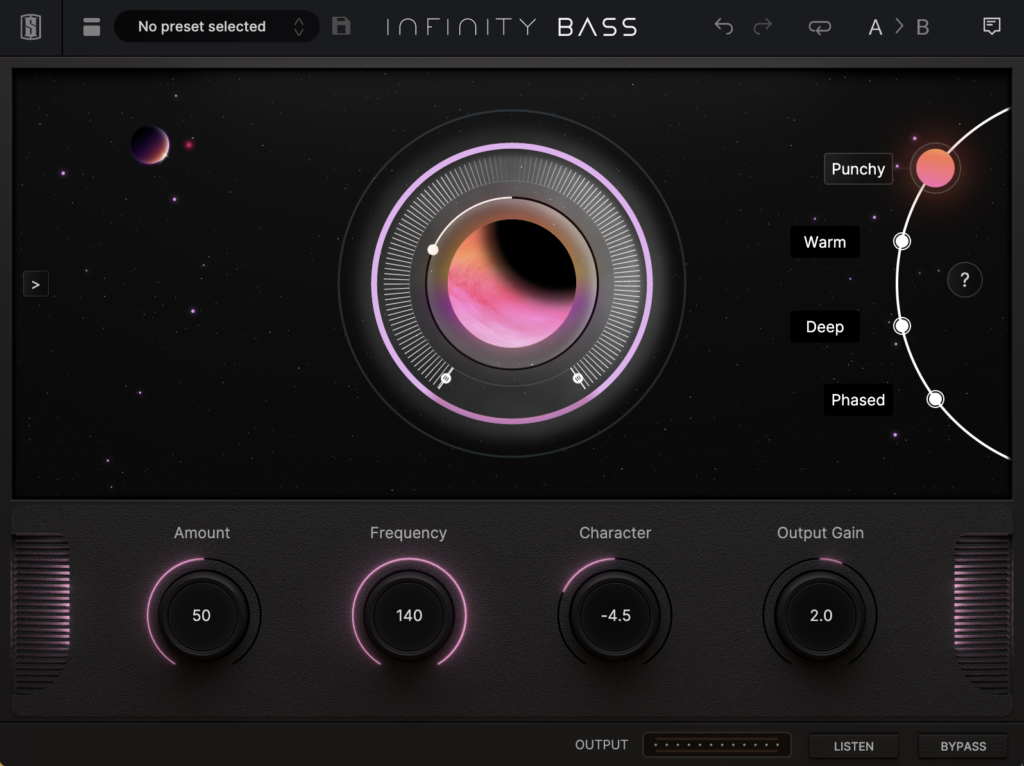
We’re so excited to reveal Infinity Bass, our brand-new bass enhancer and subharmonic generator. Designed to punch up your low-end and fill in any gaps, Infinity Bass is a super versatile plugin that delivers booming, powerful results.
Infinity Bass features an intuitive and inspiring user interface made up of four (4) different processing Modes and four control knobs that shape your sound to perfection. There’s also a Listen button you can engage to isolate the processed part of your signal, so you can hear exactly how the plugin is affecting your sound.
How Does It Work?
The Controls
Infinity Bass is operated by four (4) control knobs: Amount, Frequency, Character, and Output.
The Amount control adjusts the strength of the overall effect. It can be controlled either by adjusting the corresponding knob or by interacting with the moon in the middle of the GUI.
The Frequency control targets the set frequency range that will be used to generate sub-harmonics and influence overall tone processing.
The Character control offers different sound flavors by modifying certain characteristics of the signal depending on the selected Mode. (More details on that below.)
The Output control influences how much output gain is added to the processed signal
Infinity Bass also features a Listen button, which isolates the processed portion of your signal so you can hear the effect the plugin is having on the source.
The Modes
Now that we’ve covered the main controls, let’s dive a little deeper into the Modes.
Each Mode brings a different sonic character to your source, whether it’s a single track, a stack, or a full mix:
Punchy is useful on bass lines and kicks that require more punch or presence in a mix. It’s also good for boosting old mixes, at the risk of boosting low-end noise. The Character control blends additional saturation into the enhanced signal so that the bass will stick out in the mix.
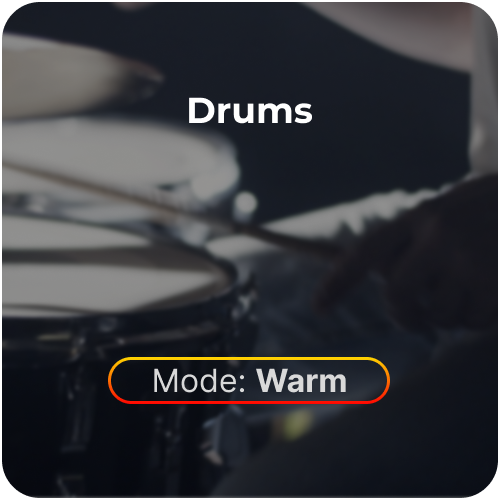
Electric Bass
Warm produces an octaver-like effect with lots of harmonics that works best on monophonic material, like bass DIs or synths. The signal within the frequency band is split into two individual bands, each of which generate a sub. The Character control then adds even more saturation to have more presence, while the Frequency control is used to tune the range of the generator to the source material to get the best result.
Drums
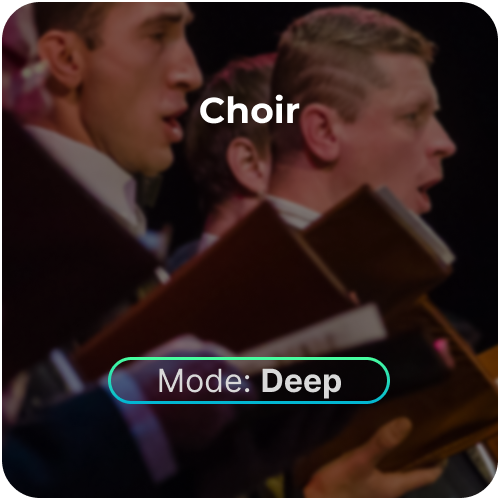
Deep is a clean sub-bass generator with dynamics control. The signal within the frequency band generates a monophonic sub-bass. The character controls the sub’s decay and dynamics to dial in the shape of the generated signal. It’s perfect for adding missing low-end to kicks and basses, and for full mixes whose low-mids aren’t too crowded.
Choir
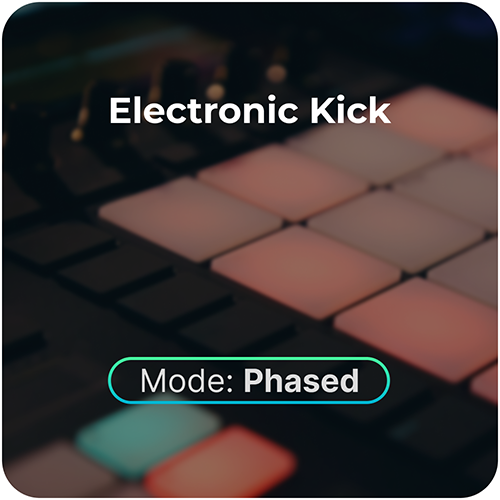
Phased smears your bass content around, adding resonance and lowering the peak amplitude of the source signal, which may enhance loudness. This mode only affects the signal content below the range set by the frequency control.
Electric Kick
From subtle adjustments to full-blown transformation, Infinity Bass is a do-it-all tool that’s guaranteed to become a new secret weapon in any producer’s toolkit.
Infinity Bass is available now in the All Access Pass or as a standalone perpetual license for $149. To learn more about the plugin, click here.
Rob Ruccia is the epitome of a lifelong musician. After a lengthy career that touched every conceivable corner of the music industry, Rob has maybe made the biggest name for himself in the credits of your favorite plugins and music creation tools.
Fluent in Pro Tools since version three and always striving to be ahead of the tech curve, Rob has become a go-to engineer for some of the biggest names across the entertainment spectrum. His resume includes everyone from legendary jazz musicians like Daryl Jones and Wallace Rooney to YouTubers like Rob Scallon and Andrew Huang.
A few months ago, Rob was kind enough to talk to us from his home base at Uptown Recording in Chicago, where he has been the chief engineer for over 20 years. We talked about the early days of recording tech, the dark side of the music industry, and the one lesson you have to keep learning the longer you live in the studio.
—
How are you doing on this wonderful Wednesday?
Pretty good. It’s going to be a busy evening for me, I’ve got a bunch of video syncing I have to do.
Fun stuff. Let’s get right into it: for those who don’t know, tell us a little bit about yourself.
Well, I’m a musician first. I became a recording engineer as a way to facilitate getting my music out there. I became a professional touring musician and made a couple of records on major labels, then fell back into the studio and never looked back.
Do you remember when you first fell in love with the music-making process?
Growing up there was a piano in my house, so there was always something to push and make noise with, whether it was a pitch noise or a rhythmic noise. My parents allegedly complained about it, but they also fueled it by never taking the piano away. They eventually got me lessons, and even got me a trombone when I wanted to start to play in the school marching band or orchestra.
Orchestra taught me how to read music, and then I started playing bass. That led me to a metal band, which got me a record deal…and then I realized that it cost way too much money to make records on a record deal, so I learned to do it myself.
What was the first thing you saw in the studio environment that made you think, ‘This is it’?
When I saw moving faders for the first time in maybe 1993-1994. I thought I was tripping for a second, like my mind was playing tricks on me. Now of course I know it was MIDI-based automation, and very archaic compared to what’s available now, but it was one of the things that led to me getting bitten by the tech bug.
It helps that I was already into the computer side of things, and that was where audio was headed at that point. I got in on Pro Tools at version three, which was a lot easier to navigate than a four-track or a cassette-deck recorder, or even analog tape. It was a matter of just finding the fastest way to get my music out. It was a means to an end that led me to this particular end.
Did it purely start as a means to an end, or was there something specific you loved about the process from the beginning?
I fell in love with Pro Tools because it was like the visual side of music that I was never able to access on tape. Before Pro Tools, you couldn’t see the music you were working on. I know it’s “best practice” to primarily listen while you’re working, but I can read waveforms like a language. I look at a screen and see where the ‘words’ are—they don’t look like words to anybody else, except for people who can read them like I can.
It’s a passion that I got into because, first and foremost, I like being able to control things and have them automated. Between majoring in acoustic science and my career as a professional musician, I understood the basic premise of how to treat rooms and make things sound good. I eventually started to realize that if my professional music career wasn’t going to make me the rock star I thought I would be, then maybe I could be the wizard behind the curtain.
How did you end up majoring in acoustic science? Was that always the plan?
Luckily, Columbia also had a pretty well-known local acoustician running the acoustic science program. Since he wasn’t someone I’d be interning for, I decided to study with him. I really wanted to learn about what made sound ‘good’, as well as what made it dangerous and exciting. My final paper was on sonic warfare and the research for that project blew my mind. There are so many ways to destroy stuff with sound. [laughs] But I use it to create.
Had you worked in studios or recording before you went to college?
Yeah. My band in high school did our first recordings on an 8-track reel-to-reel, and then it upgraded from there. I had my own Portastudio, then moved to ADAT recording on tape. At that time, computers and digital workstations were super unreliable and very risky to work with—basically, if you didn’t want to lose your whole project, you worked with tape. That was kind of my path to the future of the recording process.
Was it specifically that element of control and being able to visualize all of it that drew you closer to the studio?
I really wanted to be able to control what I heard. I’d learned that paying other people to try and get the sound I had in my head was a futile effort. At a certain point, I felt like I was just spinning my wheels. I started to say, ‘What if I could do it myself and get it to sound the way I want?’
Eventually people were willing to pay me to get it to sound the way they wanted. Low-budget projects often came with unrealistic expectations at first, but the bigger-budget projects gave me the kind of control I wanted, so they could have the vision in their head come out in the speakers.
That’s really where the control factor comes in. Not to say I’m a control freak or anything—it’s just really nice to be able to control every aspect of what ends up going out. A lot of people listen to my work, so it’s rewarding to see the sound I worked on enjoyed by hundreds of thousands or even millions of people.
“There’s always gonna be the need to have somebody record your stuff and get it out there…After I left the stage, people came to me because they knew that I knew my stuff. I made good-sounding things because I came from a world of good-sounding bands and good-sounding recordings.”
That’s actually a perfect segue into my next question: how did First of October get started?
First of October was born by accident. I did a project with Rob Scallon before he was a YouTuber. When I first met him, he was just the bass player in a band that came through Uptown Recording. He was just out of high school, maybe even still in high school, at the time. From there, he had me master some of his other projects, and then he eventually brought in a couple of his own YouTube channel projects to do here at Uptown.
Rob and Andrew [Huang] just decided they wanted to get together and make a record in a day, and they asked me to helm it. They didn’t tell me that they hadn’t written anything at the time, though. I thought they had a record ready to go and they were giving themselves just one day to record it, which is a challenge I would expect from YouTubers, but no. Nothing was prepared—they just kind of came in and went for it. Sure enough, it became a viral thing that led to a second year and then a third and a fourth, going on to the fifth one now.
Any big plans for the 5th anniversary?
This upcoming year we’re going international again. I can’t spill the beans on it yet, but as an engineer, I am gonna weep when it starts. We’re going to be working in the holy grail of studios.
That’s a really fun teaser. Do you feel like a third member of that band at this point?
Yeah, and they consider me that. That’s why they brought me to Canada instead of getting a local engineer, and that’s why we’re going on another trip this year. The two of them also now have a new series that came out on April 1st called Sonic Boom. We made 12 episodes in a week up in Canada at this studio called Noble Street, which is a really awesome facility.
Oh that sounds very cool, talk a bit more about that.
The show is like a mini First of October. Each episode is a challenge, with ideas flying around at a breakneck pace until they’ve got something. They rely on me to help them make it happen, because I know what to expect from one of their sessions. At the end of the day, when they’re done throwing a thousand things at me, I can still make it sound like a record.
Speaking of First of October, the “Album in a Day” process is so high-octane and frenetic, yet you never struggle to keep up. Were you always naturally adept at navigating a studio environment, or was it a more gradual development to the point where you were able to handle a session like that?
Well, the studio environment has naturally adapted to the needs of the people operating them—they’ve gotten increasingly ergonomic, and things are always within reach.
In the first studio I worked in, I was intimidated by everything. Patch bays, moving faders, microphones on stands with giant counterweights that I had never seen before and wondering why before realizing they’re worth more than my car, that sort of stuff. But always being willing to grow with and adapt to the technology allowed me to get as fast as I am with Pro Tools, which helps facilitate projects like First of October. The days of the 14- to 15-hour studio sessions are kind of gone.
Can you talk a bit about the process of becoming the head engineer at Uptown Recording?
My first paid studio gig as an assistant engineer cutting tape at a studio in Illinois called Sound Video Impressions, they were the first studio to have a 16-track tape machine in the ’70s. That was when Pro Tools and this other platform called Sonic Solutions were the first DAWs that people were using to do professional editing from analog dumping. I ended up diving so deep into Pro Tools that my name is actually in the credits of the software because I’ve been a tester for so long.
I was between 15-16 when I started learning on a four-track, was learning how to automate by 19-20 years old, and then paused at 25 to go on tour with huge bands like Godsmack, Deftones, even Nonpoint, who I still work with now. Then, in about 2002, I fell into Uptown Recording and sort of just made myself chief engineer.
When Uptown was founded, there wasn’t anyone there who had the same intimate knowledge of Pro Tools and more modern recording technologies that I did, nor did anyone have a clientele as large as mine. The studio needed business and a chief engineer, so I just jumped in and never looked back.
Was leaving the stage for the studio always part of your plan?
Yeah, the studio was always part of the plan; the plan was just accelerated when the music industry chewed us up and spit us out, as it does. We were coming from Chicago at the exact time Disturbed got signed, and they’re one of the biggest metal bands that ever broke from Chicago. There were seven other metal bands that got signed at the same time, and they’re the only one that still plays stadium tours. We all got thrown against the wall, and almost all of us fell off the wall.
That’s what got me thinking more about the behind-the-scenes side of the business. There’s always gonna be the need to have somebody record your stuff and get it out there, and the one that does it better is gonna be the one that gets the business. That definitely translated. After I left the stage, people came to me because they knew that I knew my stuff. I made good-sounding things because I came from a world of good-sounding bands and good-sounding recordings.
Thinking about all the artists that you have worked with, are there any particular sessions that stand out?
I’ve worked a lot with a pianist and music director named Robert Irving, he was Miles Davis’s music director for 10 years. The sessions I do with him are awesome, he brings in incredible musicians. There’s a bass player he brought in named Daryl Jones who played with Miles and has played bass for the Rolling Stones for a long time. He’s also brought in some guys from Earth Wind and Fire, one of the original singers from the Emotions, just a huge collection of killer, old school, real musicians. They never need any editing—you get a bunch of takes and suddenly you’ve got 19 great options to pick from.
Those sessions are packed with invaluable information. I remember Wallace Rooney, an amazing horn player who used to work with Miles Davis, as well, gave me all these different tips about mic placement for horns to get the same tone as Miles. That kind of stuff can’t be found in a textbook.
“I like being able to do things that you can’t actually do in reality.”
Were there any moments working with these legendary musicians where you found yourself in a state of shock, or have you had enough experience where you’re able to just get right into the job?
Oh sure, there were definitely moments early on where it was like, ‘Oh my god, these are musicians I’ve looked up to my whole life, and now I’m the guy recording them.’ It’s even more surreal as an engineer when these people are giving me compliments and telling me I’m one of the best they’ve worked with. But mostly, I don’t let it faze me. I think that comes from being in a national touring band and running into every major musician at festivals. You can’t be starstruck, because you’re peers at that point.
In the studio, I’m here to serve them in a way. I go out of my way to make things easy and comfortable for them, even down to making sure their headphones aren’t too loud. Those extra details mean a lot, because seasoned vets will bring up horror stories from other studio spaces they’ve been in. As long as I don’t become the subject of one of those stories, I’ve done my job.
All right, let’s switch gears. You have a lengthy history of testing products for Pro Tools and other companies, but you’ve been a tester for Slate Digital for a very long time too. Do you remember the first Slate Digital product you tested?
It was the ML-1 mic. I got Nonpoint to come in in February 2016 to do their first album on Universal. It was huge for me because they booked the entire month. The version of the ML-1 I used with Elias [Soriano, singer for Nonpoint] was a beta version. There’s an album out there with that early ML-1 on it, all just because I was testing it at the right time.
Eventually, testing the mics got me beta licenses for the entire Virtual Mix Rack, and the rest is history. I love testing hardware—it’s fun to actually physically see the growth in the product.
Do you have a favorite of the virtual mic models?
The 67. When I did Sonic Boom with Andrew and Rob up in Canada, Noble Street had a pair of real 67s. I had never used real 67s before, only the models, and I was really pleasantly surprised when everything sounded like I expected it to. They sounded just like my ML-1s.
Speaking of the mics, I remember hearing you talk about a technique you discovered with the ML-1 where you’d automate switching between different models, depending on what kind of sound you wanted in different parts of the song. Could you talk a little bit more about that?
Yeah, that’s the best accident. I just thought about it in my head: instead of EQ’ing or using things like Soothe or other plugins that are out there to kind of smooth out harsh transients, I figured a darker mic might help. Sure enough, the issue got better, and I didn’t have to automate EQ or anything.
I just got creative with it. I like being able to do things that you can’t actually do in reality. You wouldn’t be able to run into the room and switch mics in-and-out that quickly in real-time; and even if you had two sets of mics on the overheads, they wouldn’t be in the same positions, so you’d have some weird timing shifts or phasing shifts happening.
That’s one of my favorite things about the ML-1: no matter what mic you’re emulating or if you’re setting up a stereo pair, you’re still dealing with individual mics, so understanding how to place them equally and correctly is still important. More and more things are getting removed from the skill set of an engineer because the software can take care of it for you; in this case, I decided to flex my technical know-how and use the software to make the previously impossible, possible.
I do it with horns too: I just did a session where I duplicated all the horn tracks, and then changed the mic on the duplicates and blended the takes between a ribbon mic and a dynamic mic. In the real world, I would never be able to get those in the same or optimal position in front of my horn while keeping everything in phase and time-aligned. It’s just really a helpful tool to experiment with.
With that in mind, do you take a hard stance on either side of the “Analog vs. Digital” debate?
I honestly use whatever sounds best. I often think back to something Chris Lord-Alge said, maybe even in a Slate Academy video, where he said, “Nobody’s gonna die if you turn your treble up to +15.” It’s true. I’m one of those naturally cautious engineers who came from the analog hardware world, so I don’t want to blow up my preamp or have it fail on me because I’ve run some super-hot signal into it. In the virtual world, it literally doesn’t matter. Producers and engineers every day are exploiting the fact that you can have a Neve glowing all day long and it’s not going to die.
Perfect example: when I was working on Sonic Boom, Rob and Andrew had a real RCA 44 from the late 1930s or early 1940s. It was a super expensive mic, and I felt so nervous touching it. I would never take that mic anywhere or put it in front of anyone I didn’t trust. Meanwhile, with an ML-2, you can get something for $150 that sounds just as good as the original when the software’s applied. That’s a big reason I’m so keen to always be on board and a little ahead with the new stuff:. if it sounds just the same as the vintage, what’s the difference?
Are there any pieces of advice you’d offer to newer, up-and-coming engineers who are hoping to develop a portfolio as extensive as yours?
It’s so key as an engineer to have infinite patience. That’s something I find myself struggling with more and more as time goes on. With technology making things so quick and seemingly effortless now, clients expect results so fast, but you have to have the patience to get there. Getting a good result at the end of the day is what the job is all about, but you also don’t want to move so quickly that you’re leaving tons of studio time on the table. As long as you remember to be patient and capitalize as much as possible on the available studio time, you’ll find success in your sessions.
That feels like as good a place to wrap up as any. You already gave us a couple of nice teasers, but is there anything that you can actually preview for us before I let you go?
Sure. I’m getting ready to do more Nonpoint recording. They’re going to be working with Chris Collier, who did the last Korn record, so that’s a pretty big deal. I’ve actually turned him on to a bunch of Slate Digital stuff, he’s been using the ML-1 a lot.
I also got one for Elias from Nonpoint so he doesn’t have to come to the studio to record vocals. That technology was especially key during the COVID lockdowns. Singers could track at home and send me their stems, and I could still use them. It’s nice to work with because while most of the magic is happening in the software, you’re still dealing with hardware. It’s not like an AI coming up with a new Drake and The Weeknd song.
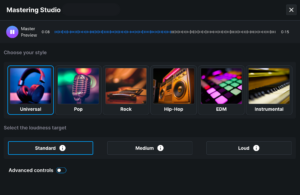
We are thrilled to unveil VIRTU™, a brand new web-based assisted mastering service available exclusively to All Access Pass members.
Combined with beloved tools like Virtual Tape Machines, Virtual Buss Compressors, Virtual Mix Rack, and the recently released FG-X 2, VIRTU makes the All Access Pass a one-stop mixing and mastering shop for users of all experience levels.
VIRTU gives your mixes the clarity, space, and depth they need to compete with your favorite chart-topping hits. With the help of curated Style profiles and easy-to-use Advanced Controls, VIRTU takes the guesswork out of mastering. Just upload your mix, select the style that best fits your track, and pick your loudness target. You also have the option to adjust some more advanced controls, like the frequency balance, compression and stereo width of your master.
Once you’re happy with your selections, click ‘Master’ to process the entire track. Then, all that’s left to do is download your mastered song from the library, where it will stay for 30 days. These masters can be confidently distributed to streaming platforms like Spotify and Apple Music, are perfect for testing in clubs or other live settings, and make excellent references for professional mastering engineers.
“VIRTU Assisted Mastering is an exciting release for this company,” said Slate Digital CEO John Bastianelli. “Not only is it another excellent addition to our already feature-packed subscription package, but it’s also a step forward into new territory. VIRTU makes the All Access Pass the only tool you need to record, mix and master your music from start to finish. We’re excited to keep evolving the scope of our product offerings, and we can’t wait to see how VIRTU helps our users along their creative journey.”
Based on the Slate Digital processing and expertise you trust for recording and mixing your projects, VIRTU’s step-by-step process makes it easy for anyone to achieve a polished, professional master.
Availability
VIRTU is available exclusively as part of the All Access Pass. Not a member? Join or start your free 30-day trial today to experience VIRTU and the rest of our full plugin suite, plus professional mix templates, over 20 GB of boutique samples, and hours upon hours of educational content in Slate Academy.
All Access Pass members get three free mastering credits per month, with additional credits available for purchase at $2.99 each. 30-day trial users will also receive three complimentary mastering credits, as well as the ability to purchase additional credits.
Special Launch Promo
Existing customers who log into VIRTU or new customers who join the All Access Pass and log into VIRTU before August 26th will double their masters. That’s right! Sign in or sign up within the first 30 days of launch, and you’ll start with six total mastering credits in your account at no extra cost.