

Key Takeaways
- You can create a quality home recording studio on a budget by choosing the right space, using DIY acoustic treatments, and prioritizing essential gear like a good computer, DAW, and microphones.
- Invest in key equipment like a reliable computer and DAW, a quality microphone for your needs, an audio interface, and either headphones or studio monitors for mixing and mastering.
- Keep costs manageable by starting with free or trial version software and plugins, focusing on optimizing your workflow, and strategically purchasing additional equipment as your budget allows.
Want to set up a home recording studio on a budget? In this article, we’ll show you how it’s not about how much you spend, but about making smart choices with what you have. You’ll get practical tips on selecting and optimizing space, picking essential equipment, and finding the right tech—all while keeping a tight rein on costs when setting up a home recording studio on a budget. Prepare to transform your home into a space where quality recordings don’t break the bank.
Choosing the Right Space for Your Home Studio
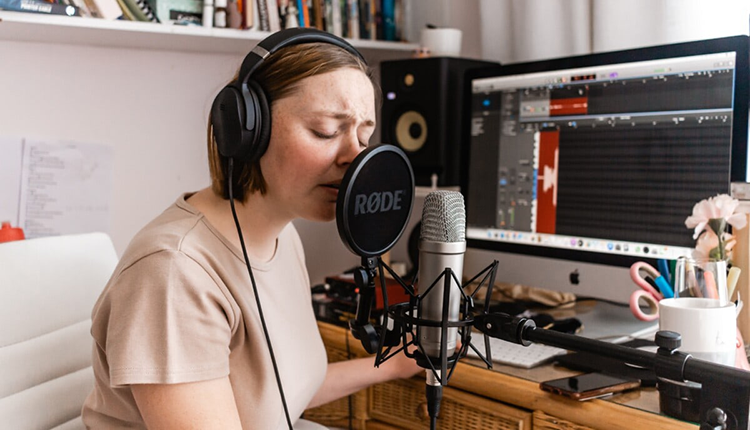
The journey to recording mastery begins with finding the perfect recording space. Think of it as setting the stage for your musical escapades. Whether you’re belting out power-packed vocals or capturing the intricate strums of an acoustic guitar, the space you choose can make or break your sound. It’s about striking a balance between convenience, acoustics, and isolation—transforming an ordinary room into a sonic sanctuary.
So, how do you pinpoint that sweet spot in your home where every beat resonates just right? Join us as we unveil the secrets.
Identifying the Best Room
Choosing the right room is like picking the perfect instrument—it sets the tone for everything else. You want a space that’s just right, not a cramped box room that chokes your creativity. Acoustic treatment may seem daunting, but even in tight quarters, it’s your ally for ensuring stellar sound.
And remember, your monitoring setup needs to fit like a glove; after all, you’re sculpting sounds that might one day fill arenas. Size does matter, but it’s what you do with it that counts.
DIY Acoustic Treatment
Now, don’t let the phrase ‘acoustic treatment’ send shivers down your spine. It’s not about breaking the bank; it’s about breaking the notion that good sound costs a fortune. With some ingenuity, everyday items like blankets and foam can be your best friends in the quest for crisp, clear sound.
From dampening harsh echoes to taming boisterous bass frequencies, your DIY efforts can transform a mundane room into a recording haven that even sound engineers would nod to.
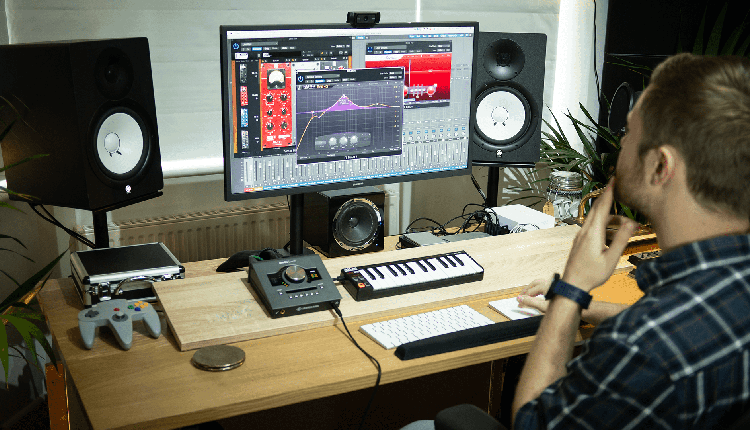
The Core of Your Studio: Computer and DAW
At the heart of every home studio beats the mighty duo: a dependable computer and a digital audio workstation (DAW). This powerful pair is your trusty sidekick, capable of turning your musical visions into audible reality. Whether you’re chopping tracks or fine-tuning frequencies, your computer and DAW are indispensable allies in the art of audio production.
However, navigating the tech market can be overwhelming. Worry not, we’re here to guide you in finding the most cost-effective selections.
Selecting a Budget-Friendly Computer
In the digital orchestra of music production, your computer is the conductor. It’s got to keep all the tracks in line and the plugins in check without missing a beat. But before you shell out your savings, know this: a budget-friendly powerhouse with enough RAM to handle the heaviest of sessions and storage to archive your audio adventures is well within reach.
Whether you’re a Mac maestro or a PC prodigy, the right machine will keep your tunes spinning without spinning your wallet out of control.
Finding the Right DAW for Your Needs
Choosing a DAW is like finding the perfect rhythm—it’s got to match your style and flow. From the legendary Pro Tools to the futuristic Ableton Live, each DAW dances to its own beat, offering a symphony of features for every type of music maker.
But hey, if you’re just starting out, why not dip your toes in the water with a free DAW? Audacity and GarageBand can lay down a solid foundation without costing you a dime. And when you’re ready to level up, take advantage of those free trials to find your perfect production partner. Here are some of the other well known DAWs that professionals use:
Essential Recording Equipment on a Budget
Equipped with your computer and DAW, you’re primed to delve into the realm of recording equipment. But before you’re swept away by visions of top-tier mics and interfaces, remember, great sound doesn’t require gold-plated gear. It’s about choosing the right tools for the job without draining your pockets.
With a keen eye and a bit of know-how, you can assemble an arsenal of budget-friendly equipment that will have you laying down tracks like a pro.
Microphone Selection for Different Instruments
When it comes to mics, it’s all about capturing the soul of your sound. Whether it’s the raw energy of a drum kit or the delicate overtones of an acoustic guitar, the right dynamic microphone can make all the difference. Dynamic mics like the Shure SM58 are workhorses, ready to tackle the loudest amps and the punchiest snares.
But when you need to catch every nuance of a vocal performance or the gentle strumming of strings, a condenser mic will be your faithful scribe, etching every detail into your recording. An even better option is a virtual microphone system like the Slate Digital ML-1 that give you everything you need. And remember, placement is key—a mic angled just right can turn a good take into a great one.
Choosing an Affordable Audio Interface
Consider your audio interface as a mediator, seamlessly blending the organic essence of your music with your DAW’s digital accuracy. It’s the gatekeeper, ensuring that every note and nuance is captured in pristine clarity. But you don’t need a fortress of inputs and outputs for a home studio; a simple, sturdy interface with a couple of ports will serve you well, especially if you’re a solo act or a dynamic duo. In fact, there are various audio interfaces available in the market that cater to different needs and budgets.
Headphones vs. Studio Monitors
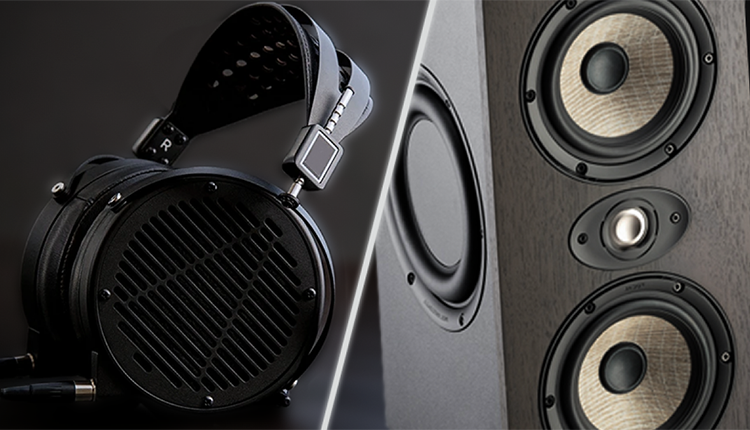
Now, let’s talk about the ears of your studio—headphones and studio monitors. Each serves a critical role in the quest for the perfect mix. Closed-back headphones are your best bet for keeping the outside world at bay while you’re in the zone. But when you’re ready to mix and master, nothing beats the truth-telling transparency of studio monitors.
They won’t sugarcoat your sound, giving you the real deal on every high, low, and everything in-between. Whether you’re tweaking a track or laying down a new one, knowing when to use which can make all the difference.
MIDI Controllers and Keyboards
As you construct your musical masterpiece, MIDI controllers and keyboards add vibrancy and depth to your sonic canvas. They’re not just keys and pads; they’re your direct line to the heart of your software instruments. With a MIDI controller by your side, you’ll sculpt sounds that breathe life into your tracks, making your music production process as expressive as it is efficient.
The Value of MIDI in a Home Studio
MIDI is the magic that makes the inanimate, animate. It’s the spark that ignites the engines of virtual instruments, turning your keystrokes into symphonies. With a MIDI controller, such as a midi keyboard, you can dial in the perfect drum beat, lay down a bass line that grooves, or weave intricate melodies with ease.
It’s about getting hands-on with your music—moving beyond mouse clicks to create something truly touch-inspired.
Cables, Stands, and Accessories
You’ve got the brain and the heart of your studio set up, now it’s time to consider the skeletal system—cables, stands, and accessories. Though they may appear insignificant, these elements form the structural support that ensures a fluid recording session.
From XLR cables that carry your voice to mic stands that hold your sound capture devices in place, these unsung heroes are vital for a stress-free recording experience.
Cable Management and Organization
Cable management is the zen of a studio setup. It’s about turning chaos into order, ensuring that every cable serves its purpose without becoming a tangled mess. Whether you’re routing cables or consolidating them with a snake, a well-organized studio is a productive studio.
Say goodbye to clutter and hello to a clean, streamlined workspace that lets your creativity flow uninterrupted.
Selecting Durable Mic Stands
Choosing a mic stand is like choosing a trusted friend—it needs to hold up under pressure and adapt to whatever situation you throw at it. A durable mic stand not only supports your microphone; it supports your artistic performance, ensuring that every note is captured just as you intended. It’s an investment in reliability that will pay off take after take, session after session.
Crafting Your First Studio Recordings
Entering the realm of recording music signifies a significant milestone for every music producer. It’s where you translate your ideas into tangible tracks that resonate with listeners. But before you hit that record button in the recording studio, there’s a symphony of preparation that needs to happen. From memorizing lyrics to recording vocals and setting levels, each step is a note in the melody of your recording process.
Let’s tune into the essentials for a smooth first take.
Setting Levels and Avoiding Distortion
Setting levels is like seasoning a dish—it’s all about balance. Too much gain, and you’ll drown in distortion; too little, and your sound is lost in the void. The sweet spot lies in the green zone of your meters, where headroom is king and clarity reigns supreme.
It’s about capturing the full dynamic range of your performance without letting it spill over into a noisy mess.
Recording Techniques for Beginners
Now, let’s turn our attention to the craft of recording and editing audio. It’s not just about hitting record; it’s about understanding the dance between the microphone and the sound source. Rehearsal isn’t just practice; it’s a prelude to perfection, minimizing the number of takes and maximizing the quality of your recordings.
Remember, the studio is your playground, so play, experiment, and discover the techniques that resonate with your unique sound.
Software and Plugins to Enhance Your Music
In today’s digital era, software and plugins serve as the artist’s tools, enriching your tracks with depth and vibrancy beyond what was previously conceivable. Some essential tools for shaping your sound include:
- Ethereal reverbs
- Punchy compressors
- Dynamic EQs
- Virtual instruments
- Synthesizers
- Drum machines
These tools, including electric guitar amps, empower you to shape your sound with precision and creativity.
But with so many options, where do you start without splurging? Let’s explore how to elevate your music with software that strikes a chord with your wallet and your artistic vision.
Utilizing Free and Trial Version Plugins
Who says you can’t add professional polish on a shoestring budget? With an array of free and trial plugins at your fingertips, you can sprinkle your recordings with industry-standard quality without the premium price tag. Some of these plugins include:
- Frequency analyzers
- Compressors
- EQ plugins
- Reverb plugins
- Delay plugins
These gems can help you achieve that radio-ready sound.
So dive into the treasure trove of freebies and trials—the perfect plugin for your masterpiece might just be a download away.
Investing in Versatile Software Instruments
Stepping up your game with a comprehensive suite of software instruments can be a game-changer for your music production. Imagine having an orchestra at your fingertips or a vintage synth collection in your digital rack—all without the hefty price tag of physical gear. These software instruments unlock worlds of sound, giving you the flexibility to compose across genres and elevate your tracks to professional standards.
It’s an investment that amplifies your musical range and versatility.
Optimizing Your Workflow: Tips and Tricks
Every seasoned artist understands that the formula for a masterpiece involves more than just talent; an efficient workflow is key. The smoother the process, the faster you can bring your musical ideas to life. It’s about clearing the clutter, setting goals, and knowing your tools like the back of your hand.
These aren’t just tips; they’re the stepping stones to a seamless creative process that lets you focus on what truly matters: making music that moves the soul.
Budget Considerations: What You Can Expect to Spend
Establishing a home studio signifies a commitment to your musical passion, which doesn’t necessarily mean emptying your savings. A basic home studio setup can be surprisingly affordable, with costs ranging from $500 to $1,500—a small price to pay for the ability to produce music on your terms. But if you’re dreaming of a more advanced sanctuary of sound, your budget might stretch upwards of $3,000 or more, depending on how deep you want to delve into the world of audio fidelity.
Prioritizing Your Purchases
When it comes to outfitting your studio, strategy is key. Start with the essentials:
- A reliable computer and DAW are the backbone of your setup.
- Invest in quality studio monitors for accurate sound reproduction—a must for mixing.
- Choose microphones that suit your immediate recording needs.
- Don’t forget to factor in acoustic treatment to ensure your recordings are crystal clear.
Remember, how you allocate your budget should reflect your unique musical journey and the soundscapes you aspire to create.
Navigating Common Challenges for New Music Producers
Initiating your journey in music production is thrilling, though it comes with its fair share of obstacles. Whether you’re facing creative blocks or struggling to finish tracks, it’s all part of the growth process. Embrace these challenges as opportunities to explore different production techniques and to push the boundaries of your creativity.
Remember, limitations can be the mother of innovation, leading to breakthroughs that set your music apart from the crowd.
Summary
From the echoes of your first home-recorded notes to the satisfaction of a polished final mix, setting up a home recording studio is a journey of creativity and discovery. We’ve explored everything from picking the perfect room to optimizing your workflow, diving into the nuts and bolts of building a studio that resonates with your artistic vision. So take these tips, mix them with your passion, and start crafting soundscapes that tell your unique story. Your home studio is more than a collection of gear—it’s a canvas for your musical dreams.
Frequently Asked Questions
What is the minimum computer specification I need for a home studio?
You’ll need a computer with at least 1TB storage, 8GB RAM, a 4-core processor, and an SSD for optimal music production. So, aim for these specs for a smooth home studio setup!
Can I use a budget microphone for professional-sounding recordings?
Yes, you can use a budget microphone for professional-sounding recordings, as brands like Shure offer affordable options that still deliver professional results. So go ahead and give it a try!
Do I need an audio interface with many inputs for my home studio?
No, you don’t need an audio interface with many inputs for your home studio. A simple audio interface with 2 inputs should be enough if you’re recording solo or only capturing a few sources at a time.
How can I improve my home studio’s acoustics without spending a lot of money?
You can improve your home studio’s acoustics without spending much by using everyday materials like blankets, towels, or foam for DIY acoustic treatment, which can effectively minimize reflections and enhance sound quality.
Is it worth investing in MIDI controllers and keyboards for my home studio?
Yes, investing in MIDI controllers and keyboards for your home studio is worth it, especially if you work with virtual instruments. They provide a tactile and intuitive way to compose and arrange music.